
Beginner Plus
This amplifier started out from a slightly different line of thinking than most of my other amplifiers. This design was to be based on an entry level build difficulty, like the Marblewood Amp, but I wanted to target some slightly different characteristics than that amplifier. The first of these is long term maintainability by someone not a typical vacuum tube enthusiast. I am planning on gifting this particular amplifier and I want the recipient to feel confident maintaining it long after I’m gone. The second is that I wanted to improve on the already excellent characteristics of the Marblewood design. I was targeting the low frequency response and the channel separation/imaging response.
Concerning the maintainability, I have some concerns about the future availability of the 6AC4/EZ81 rectifier tube used in the Marblewood. I decided that I wanted to use the ubiquitous 5U4 rectifier tube. Along with the 6V6 (or 6L6 which also work well in this amplifier) and the popular 12AU7 this tube set should be available far into the future simply because of the large numbers of guitar amplifiers which still use these tubes.
Improving the sonic characteristics of the Marblewood is a more difficult goal to maintain. To improve imaging I decided to return to individual LC filter sections on the power stage power supplies. This change alone increased the already good channel separation of the Marblewood design by almost 34dB.
The low frequency response is a more difficult problem. In the Marblewood design, the dominant factor in the low frequency response is the power stage output impedance in combination with the output transformer primary inductance. Since I wanted to retain the power stage operation point from the 6V6 optimization study, this meant dealing with the output transformer inductance. The solution was to substitute the Edcor GXSE10-5K transformer used in the Marblewood design with the Edcor GXSE15-5K. The GXSE15 has a significantly larger primary inductance than the GXSE10 while still not being so large as to make the speed and transparency of the amp suffer.
With these design decisions made, it was time to finalize the electrical design of the amplifier.
The Electrical Design
The only change in the design of the amplifier itself (in addition to the output transformer change) was to specify a 400Ω/5W cathode bias resistor for the power stages. This gives a little more thermal margin in the design while simultaneously calling out a more commonly available part. I used an Omite 40 series resistors p/n 45F400E which are 400Ω/5W/1% resistors with a conformal silicone-ceramic coating. These resistors should have a good long life in this application.
With these two simple changes the electrical design of the amplifier channel is the same as the Marblewood. Here is the schematic for one amplifier channel and the power supply.
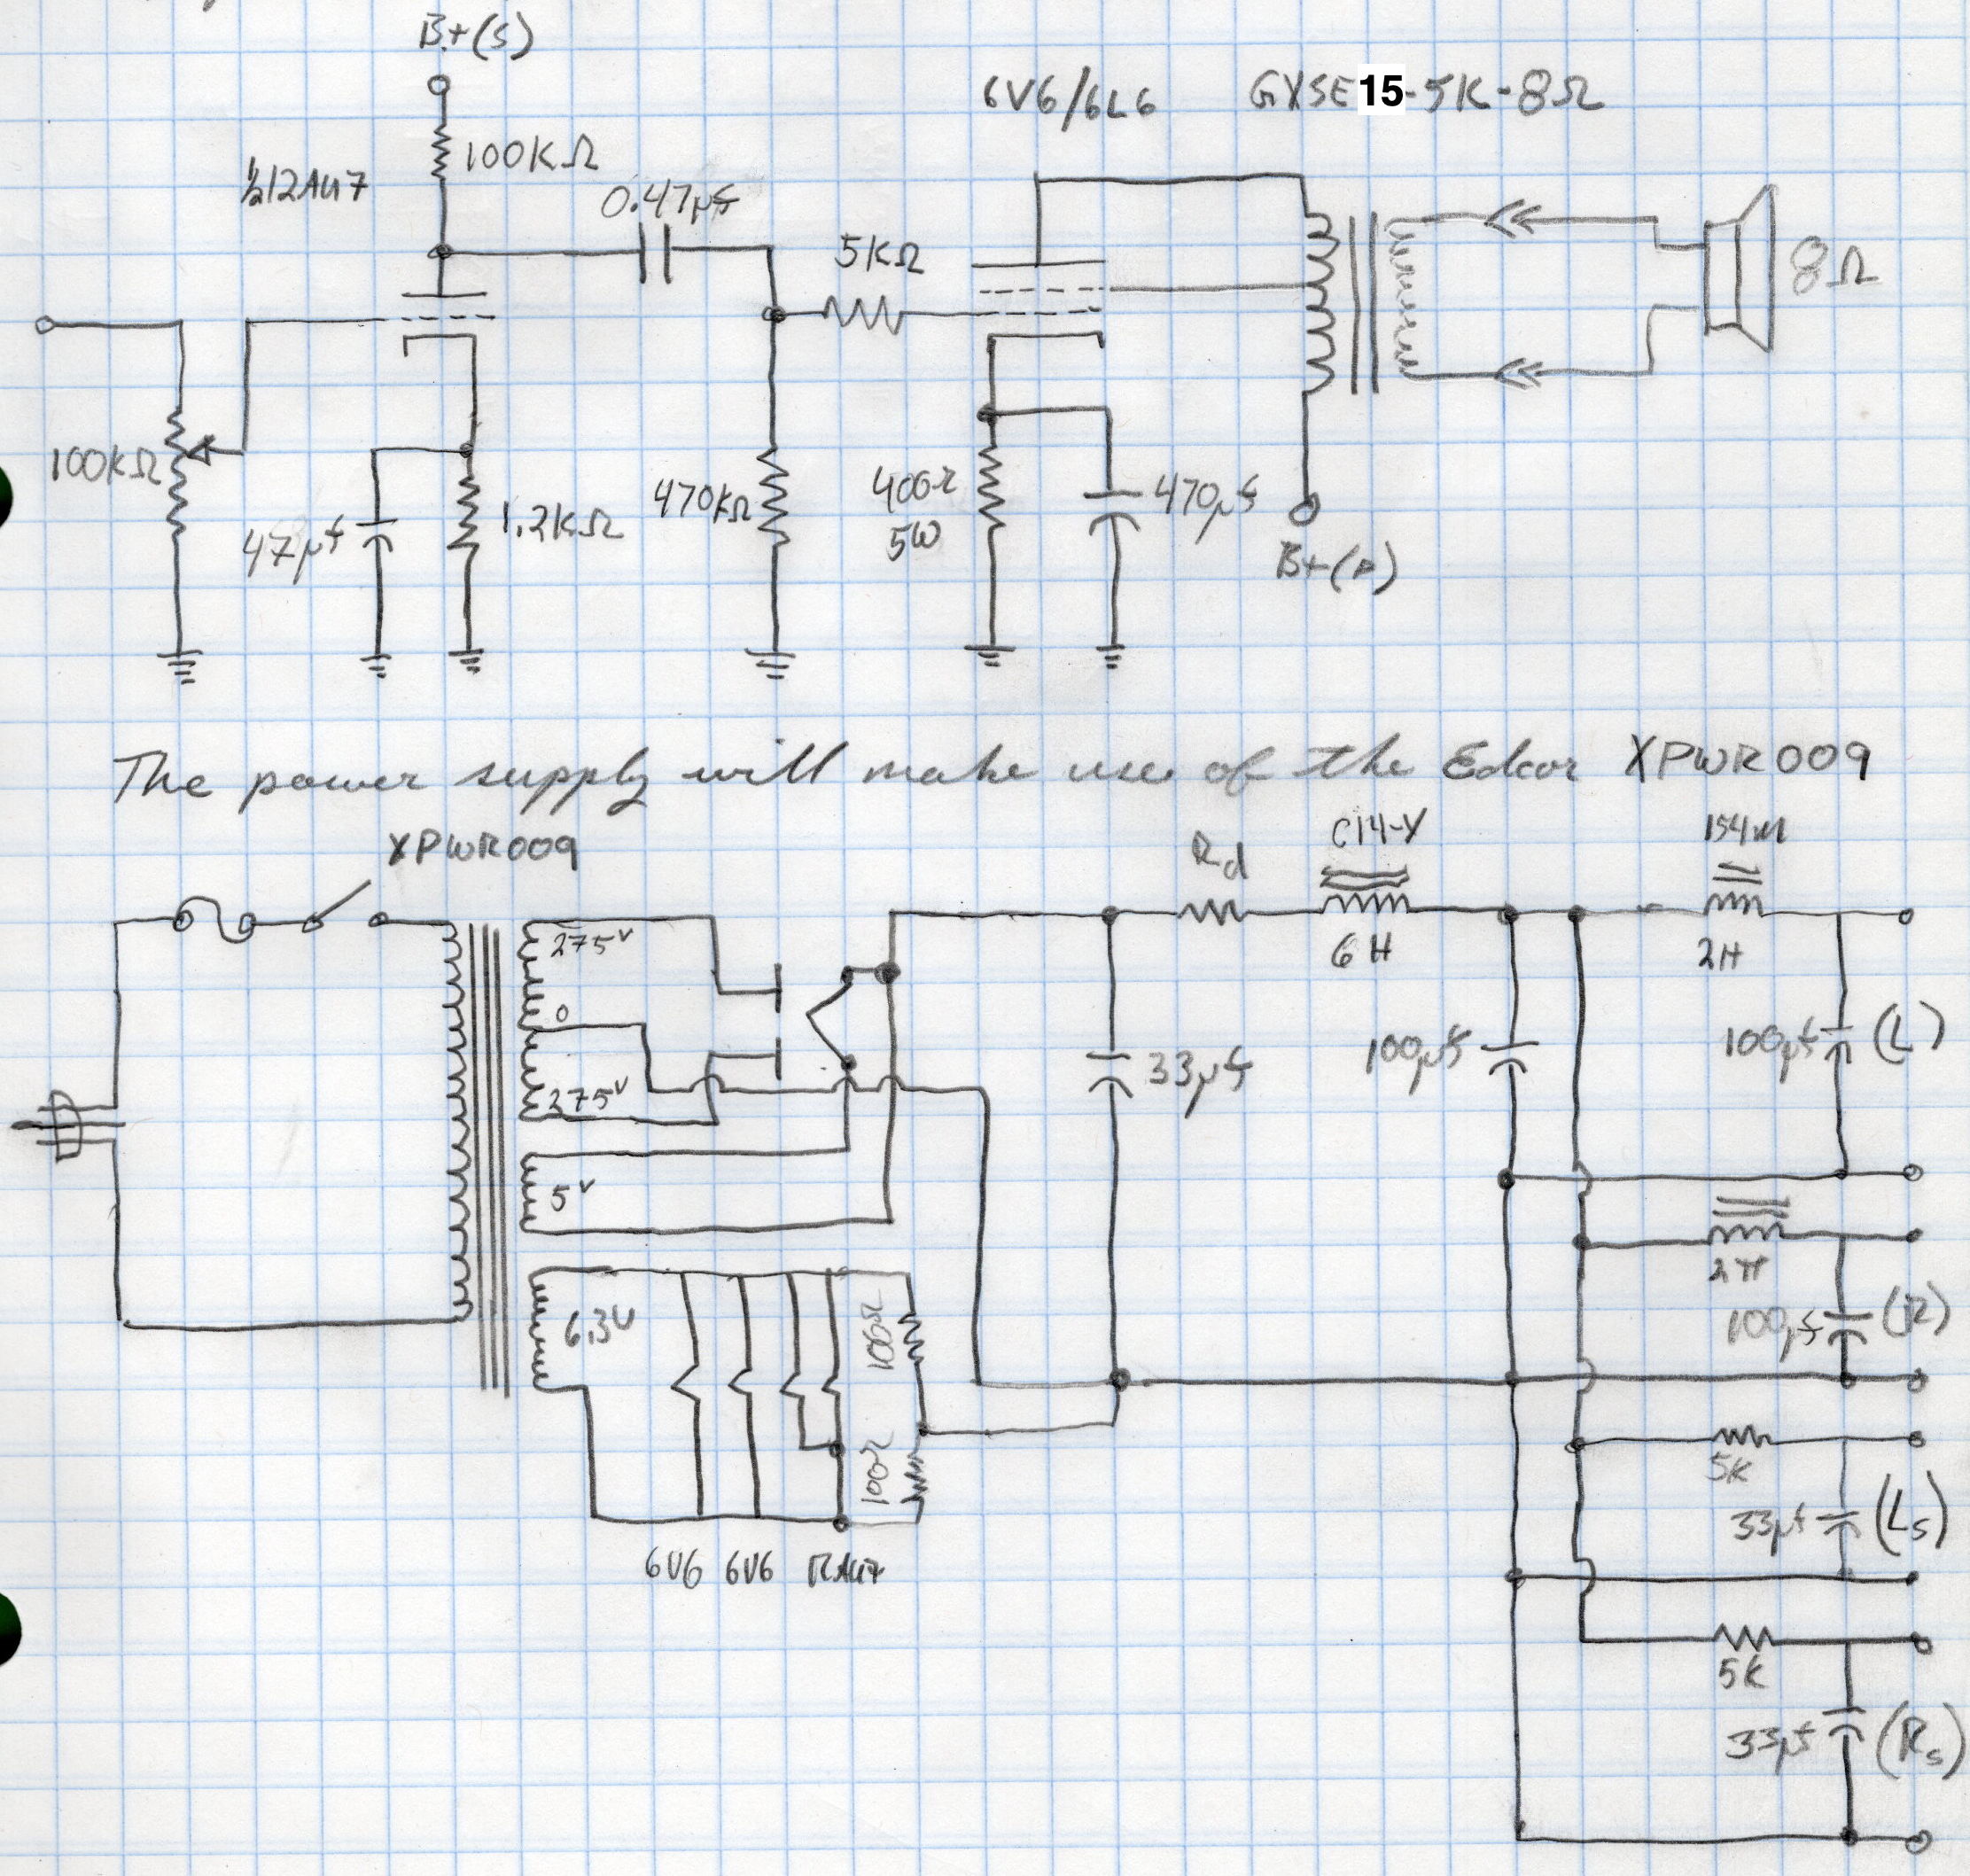
The power supply for this amplifier is a little different due to the 5U4 octal rectifier. The Edcor XPWR106 I used in the Marblewood didn’t have a 5VAC winding. So for this amplifier I settled on the Edcor XPWR009. This transformer has 550V@175mA CT, 6.3V@4A, and 5V@3A windings. This transformer has a higher current rating for the high voltage winding which should help the transformer run even cooler. The total current load for this amplifier is ≈85mA with the 6V6 power tubes and the 12AU7 driver.
The other changes for the power supply are a slightly larger primary filter choke (i.e 6H vs. 5H), substitution of 2H chokes for the 200Ω resistors found in the Marblewood power stage PS filters, and a reduction of the reservoir capacitor from 47µf to 33µf. This change reduces the steady state peak repetitive current spikes in the rectifier. Even cheap no name Chinese rectifier tubes should have no problems in this power supply.
In the actual amp build I also incorporated a power indicator using a #47 6.3V lamp and a 50Ω intensity adjustment potentiometer. This is an optional addition to the amplifier and is not reflected on the schematic above.
The Build
I wanted the layout for this amplifier to be similar to the Marblewood but distinct. I accomplished this largely by reflecting the Marblewood left to right. I also wanted an amplifier that more closely matched the size of common 19” rack size equipment. As such, I increased the top plate depth by 1” to 10” and increased the width to a full 15”. The Marblewood design was almost petite. This amplifier has a much more substantial footprint overall. Here is the layout for the top plate.
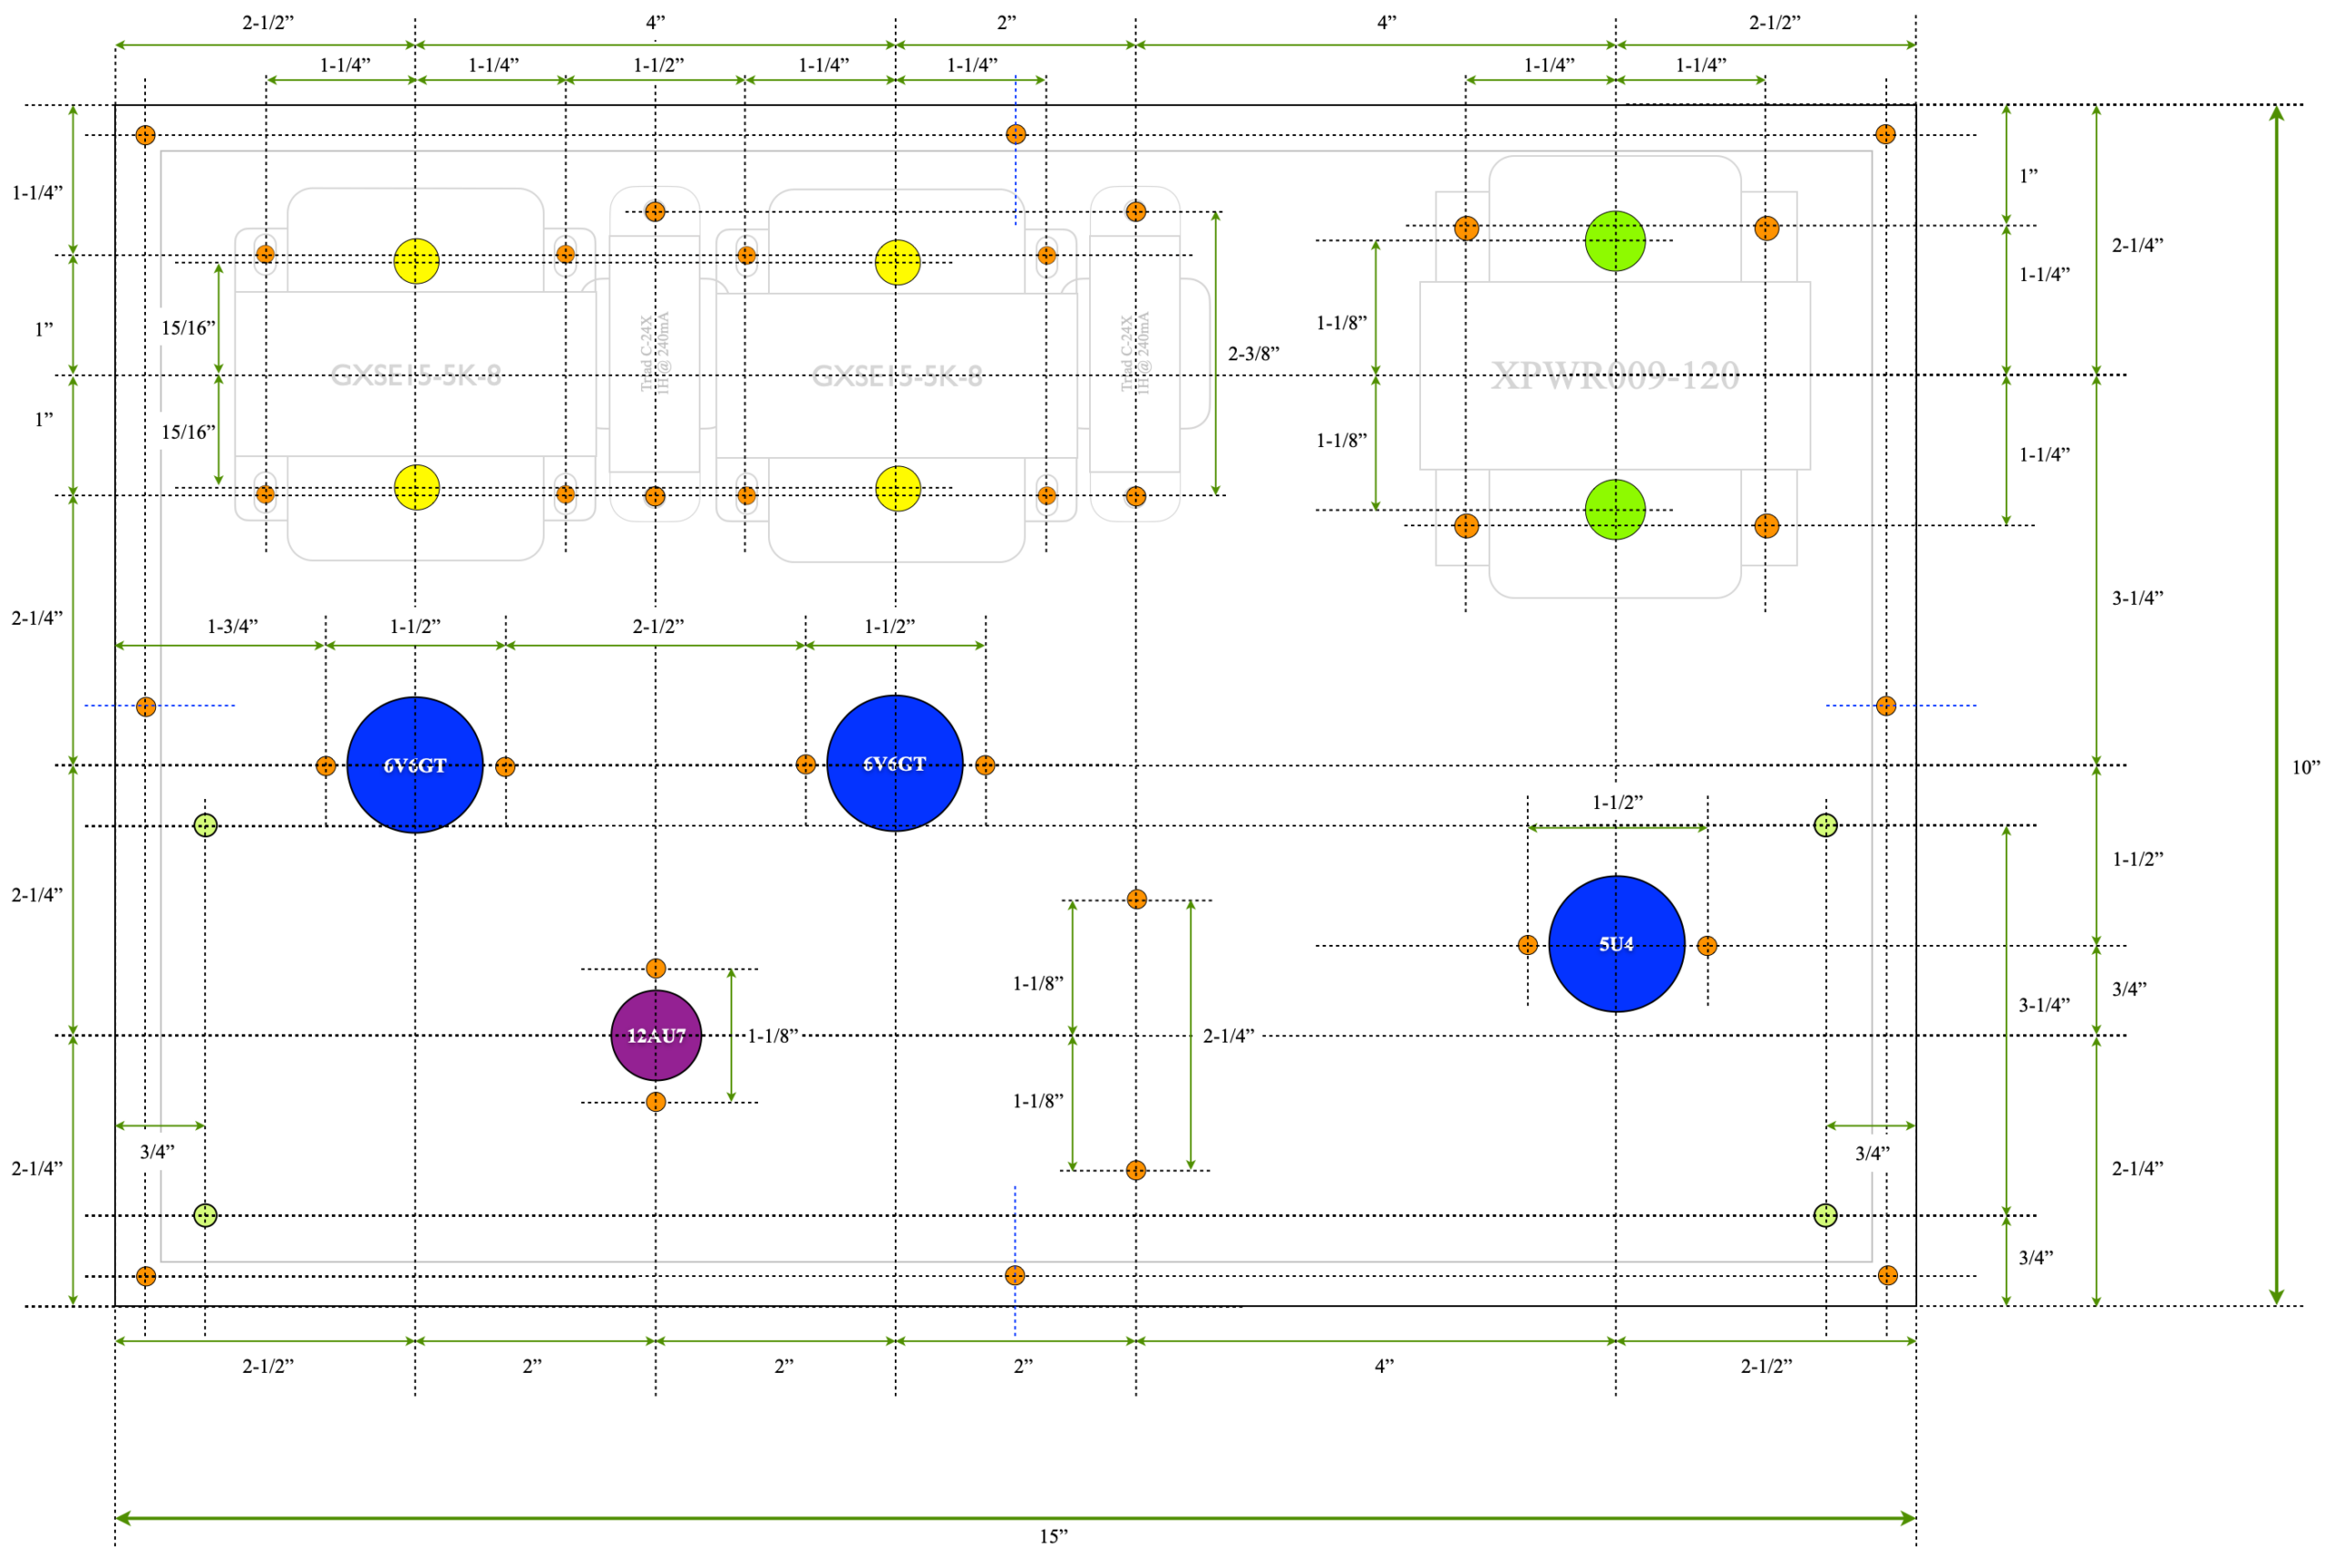
I also increased the depth of the chassis to incorporate taller control openings for power switch and volume control.
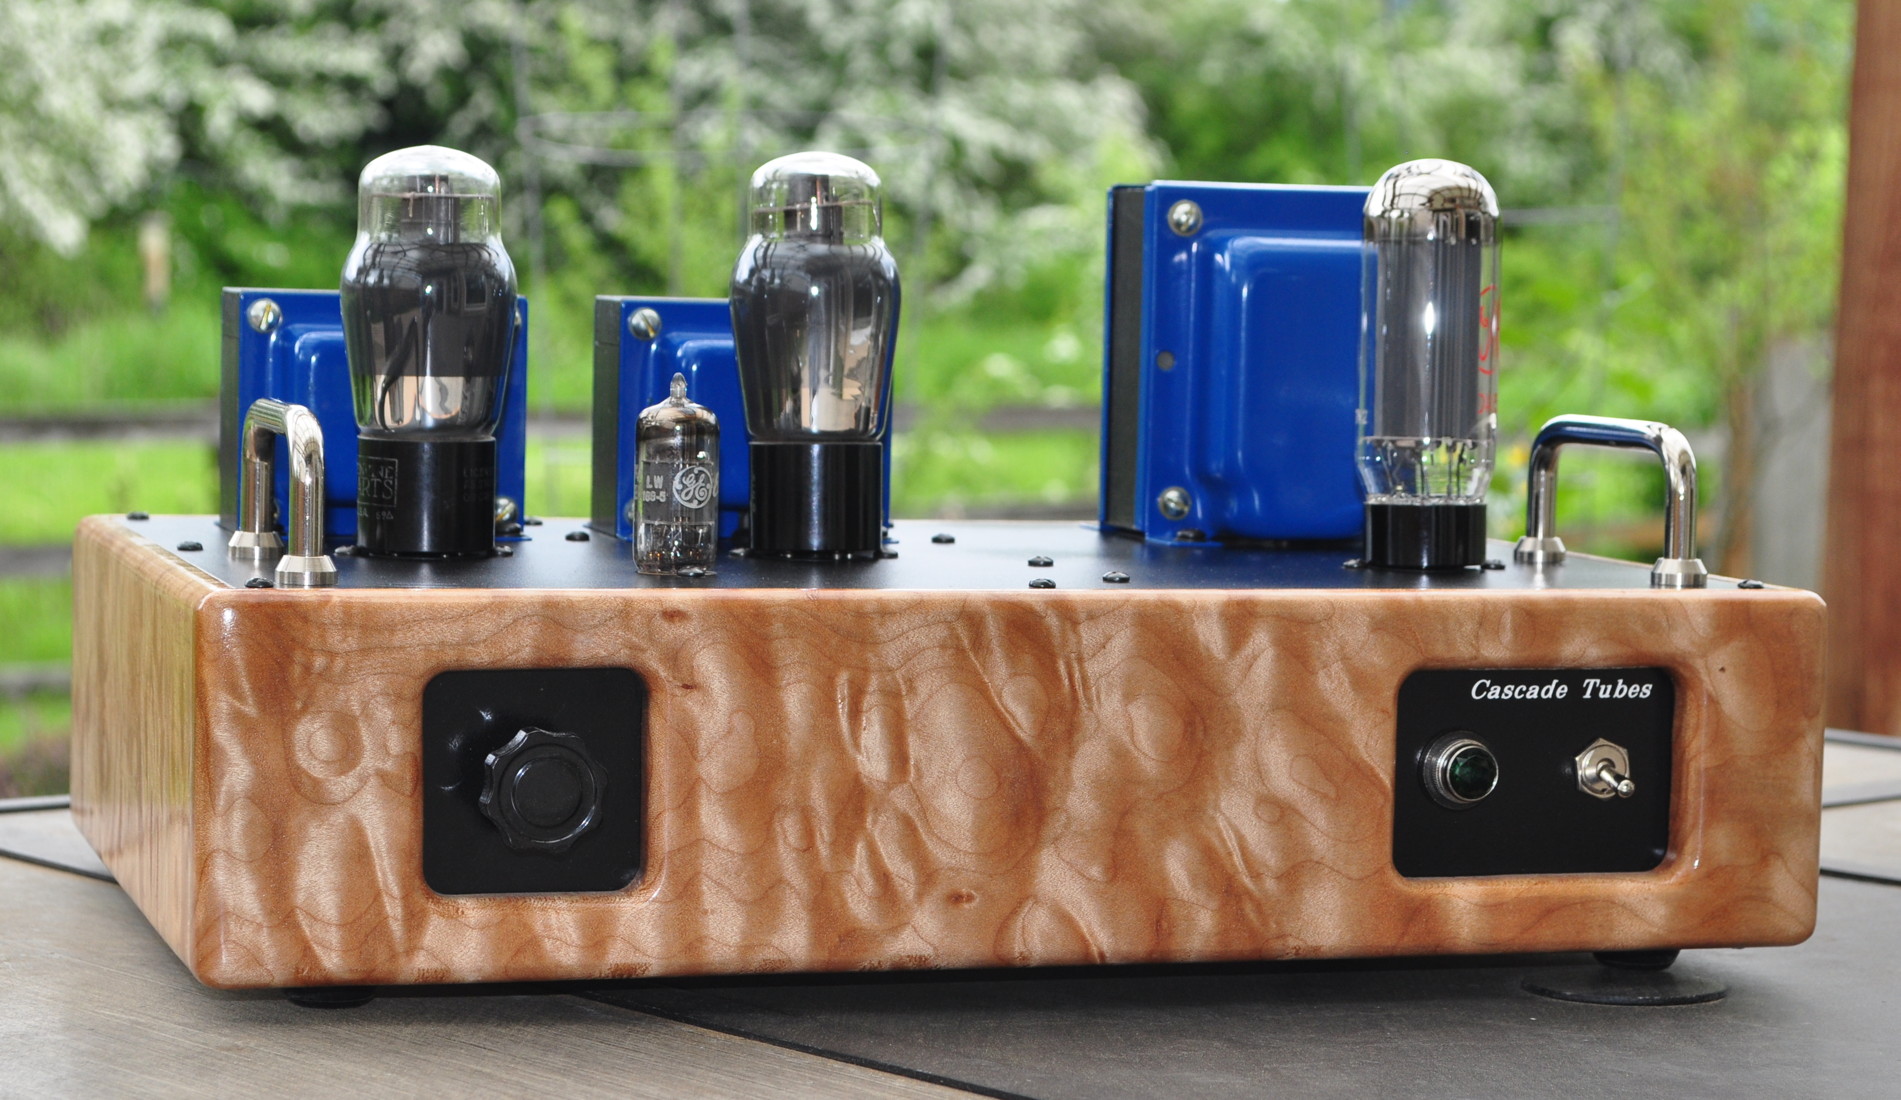
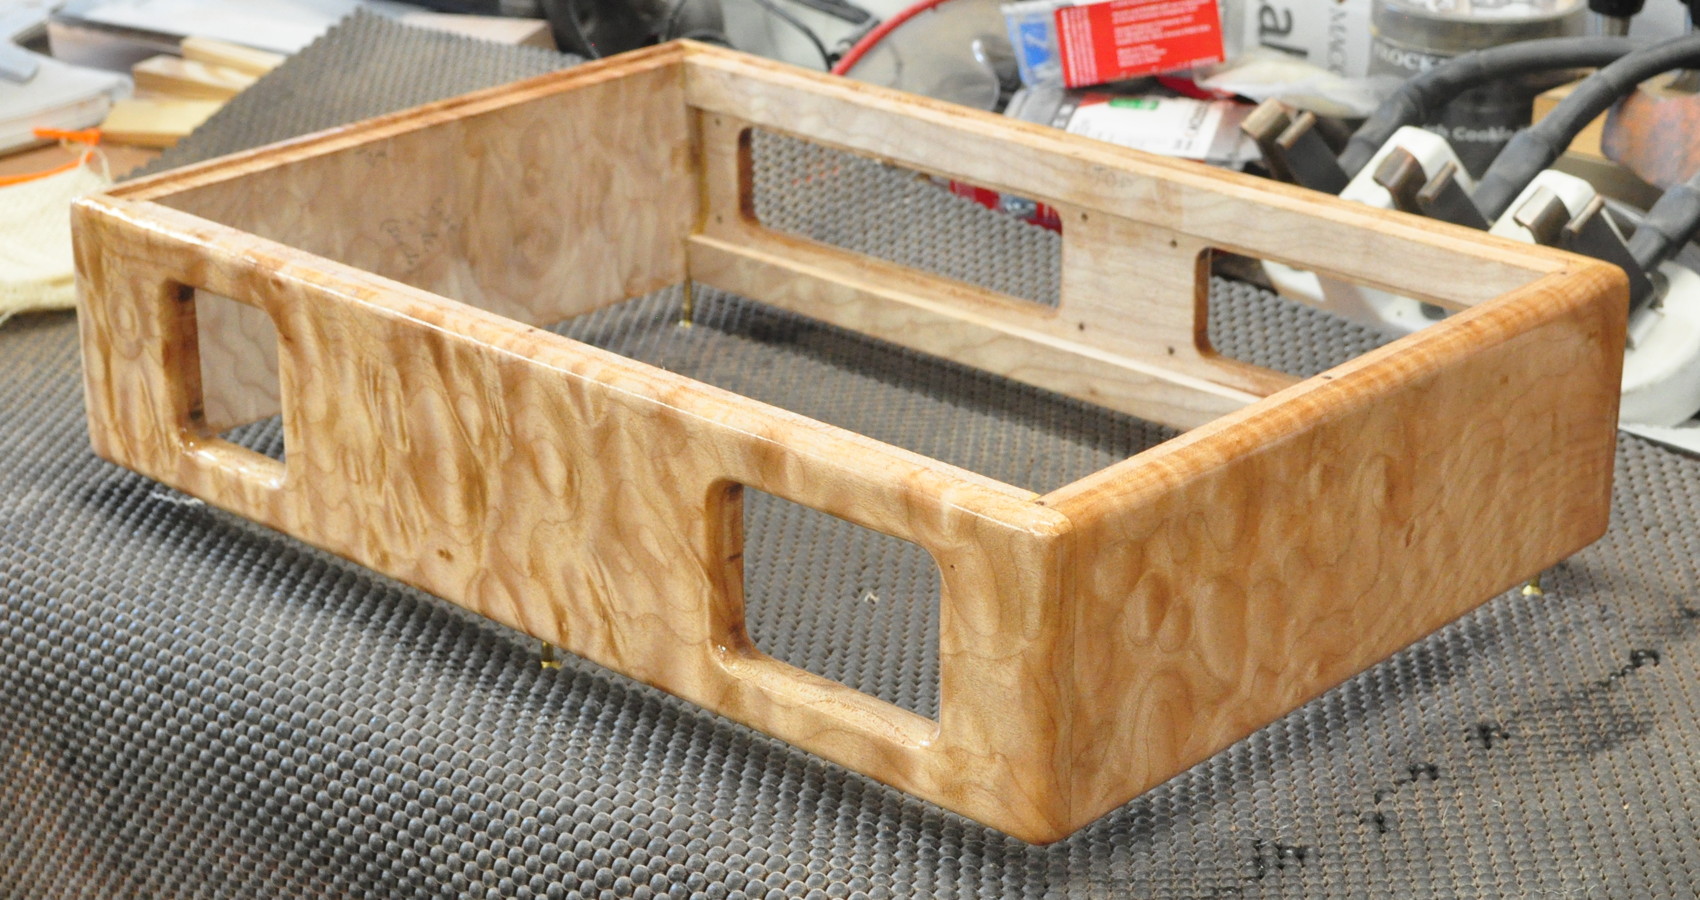
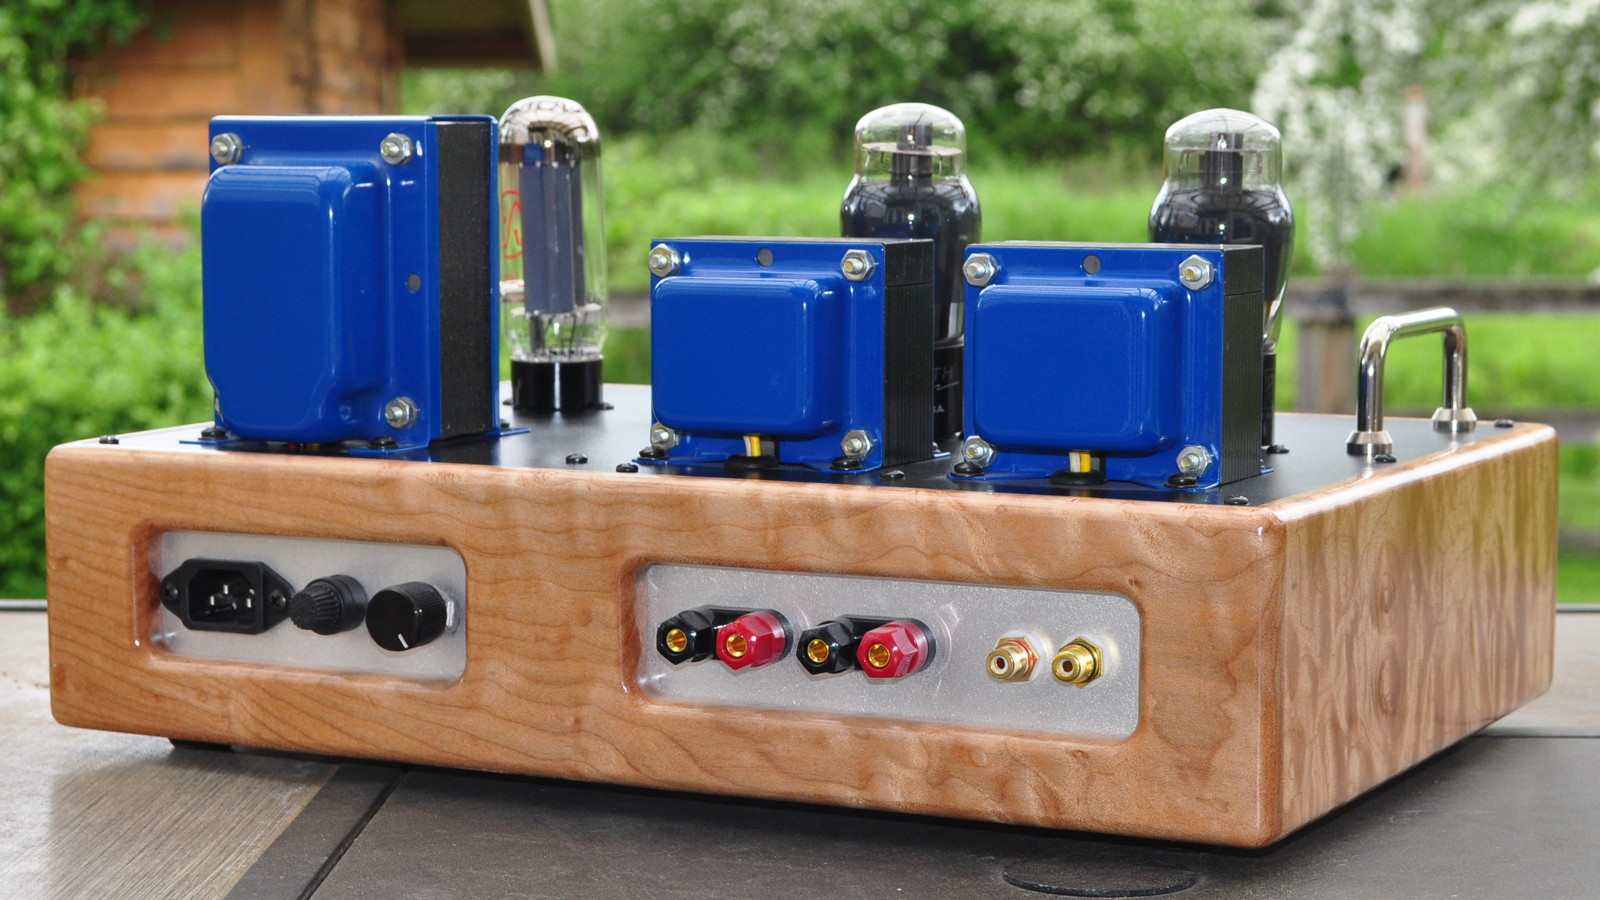
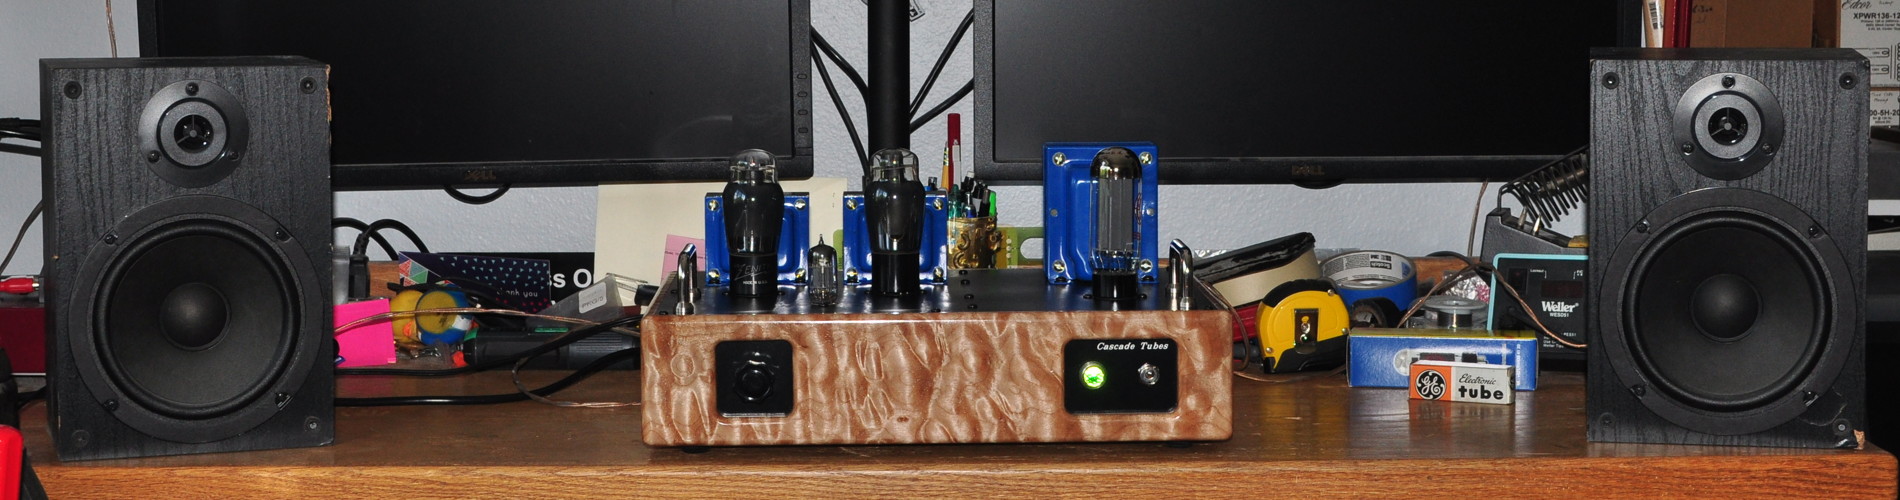
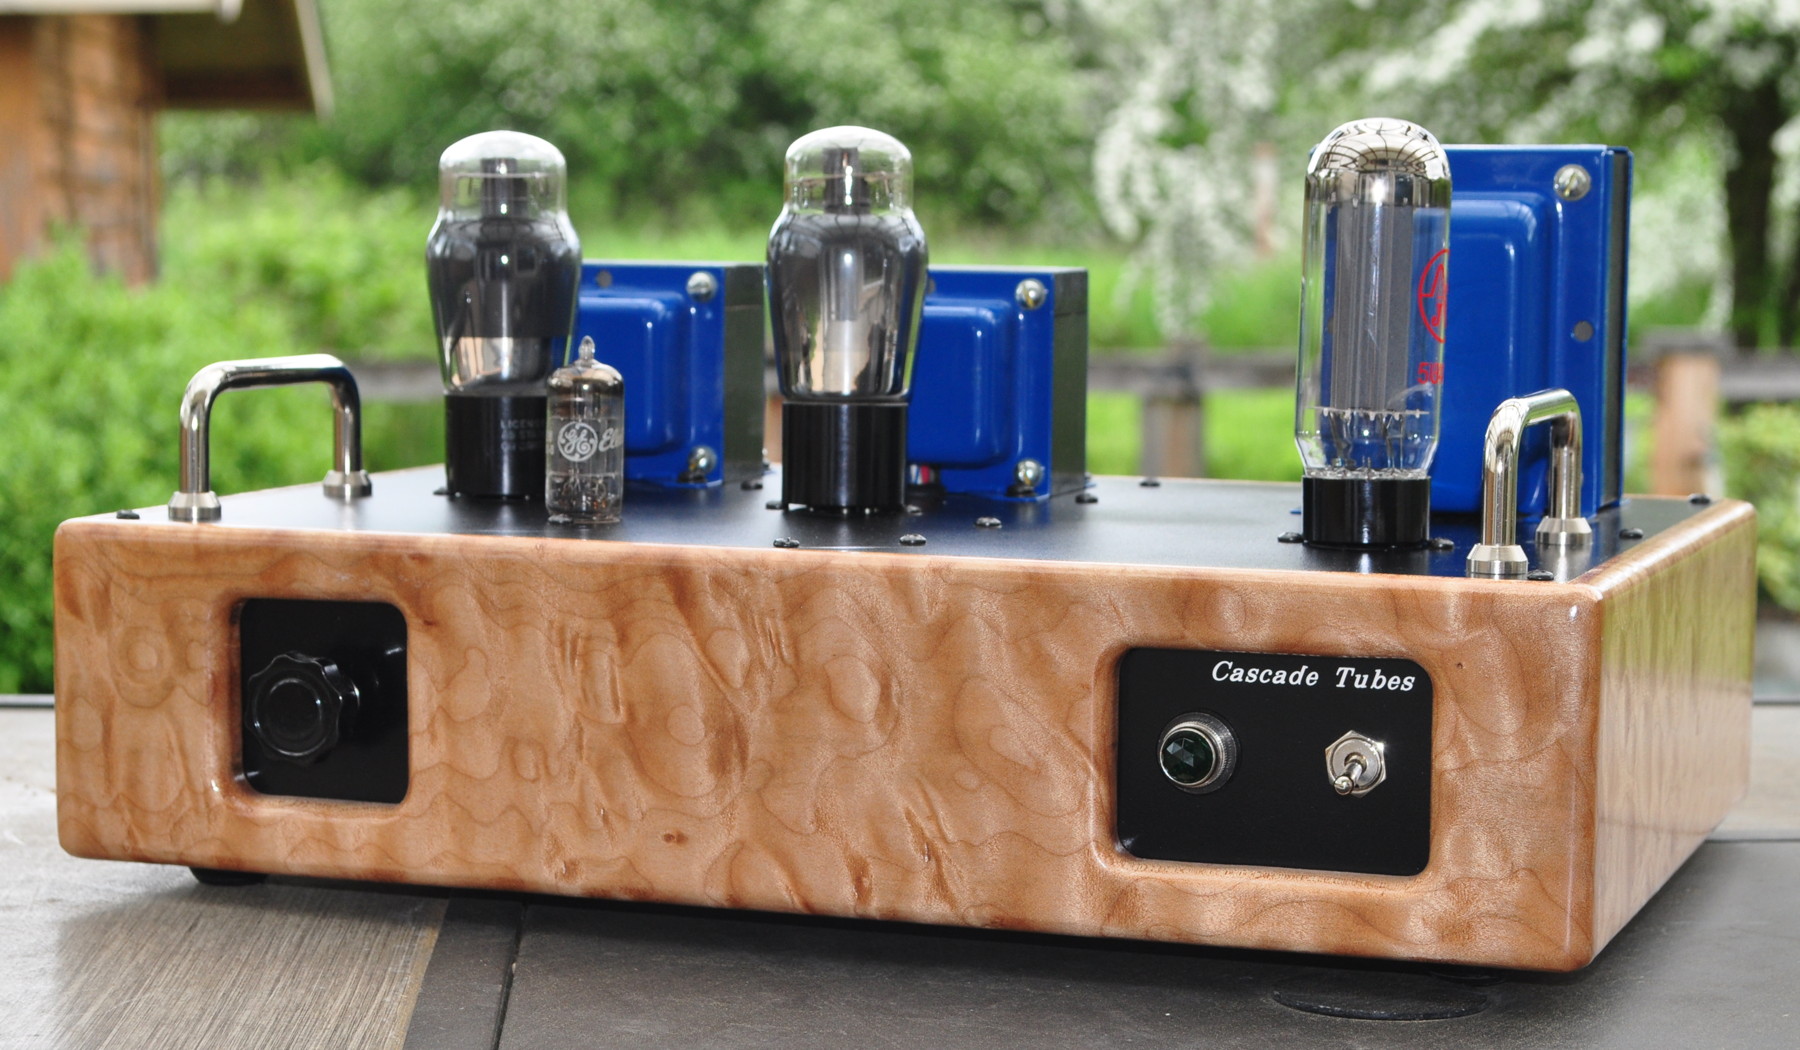
For the wood I chose, as the name implies, a plank of curly maple which has been sitting in my lumber rack for almost 20 years. This board had significant burl figure. Here is the finished chassis sitting on the bench in my workshop. The burl is really visually striking.
For the internal wiring I followed my usual practice of using terminal strips and a heavy suspend copper ground bus. As this top plate is a little larger than I normally use, the ground bus is a little more involved in this build but I stayed with a singular branched topology to help ensure no ground loop or unwanted ground current interactions.
Here is the underside of the top plate with the iron all mounted, the ground bus in place, and the initial power supply wiring installed.
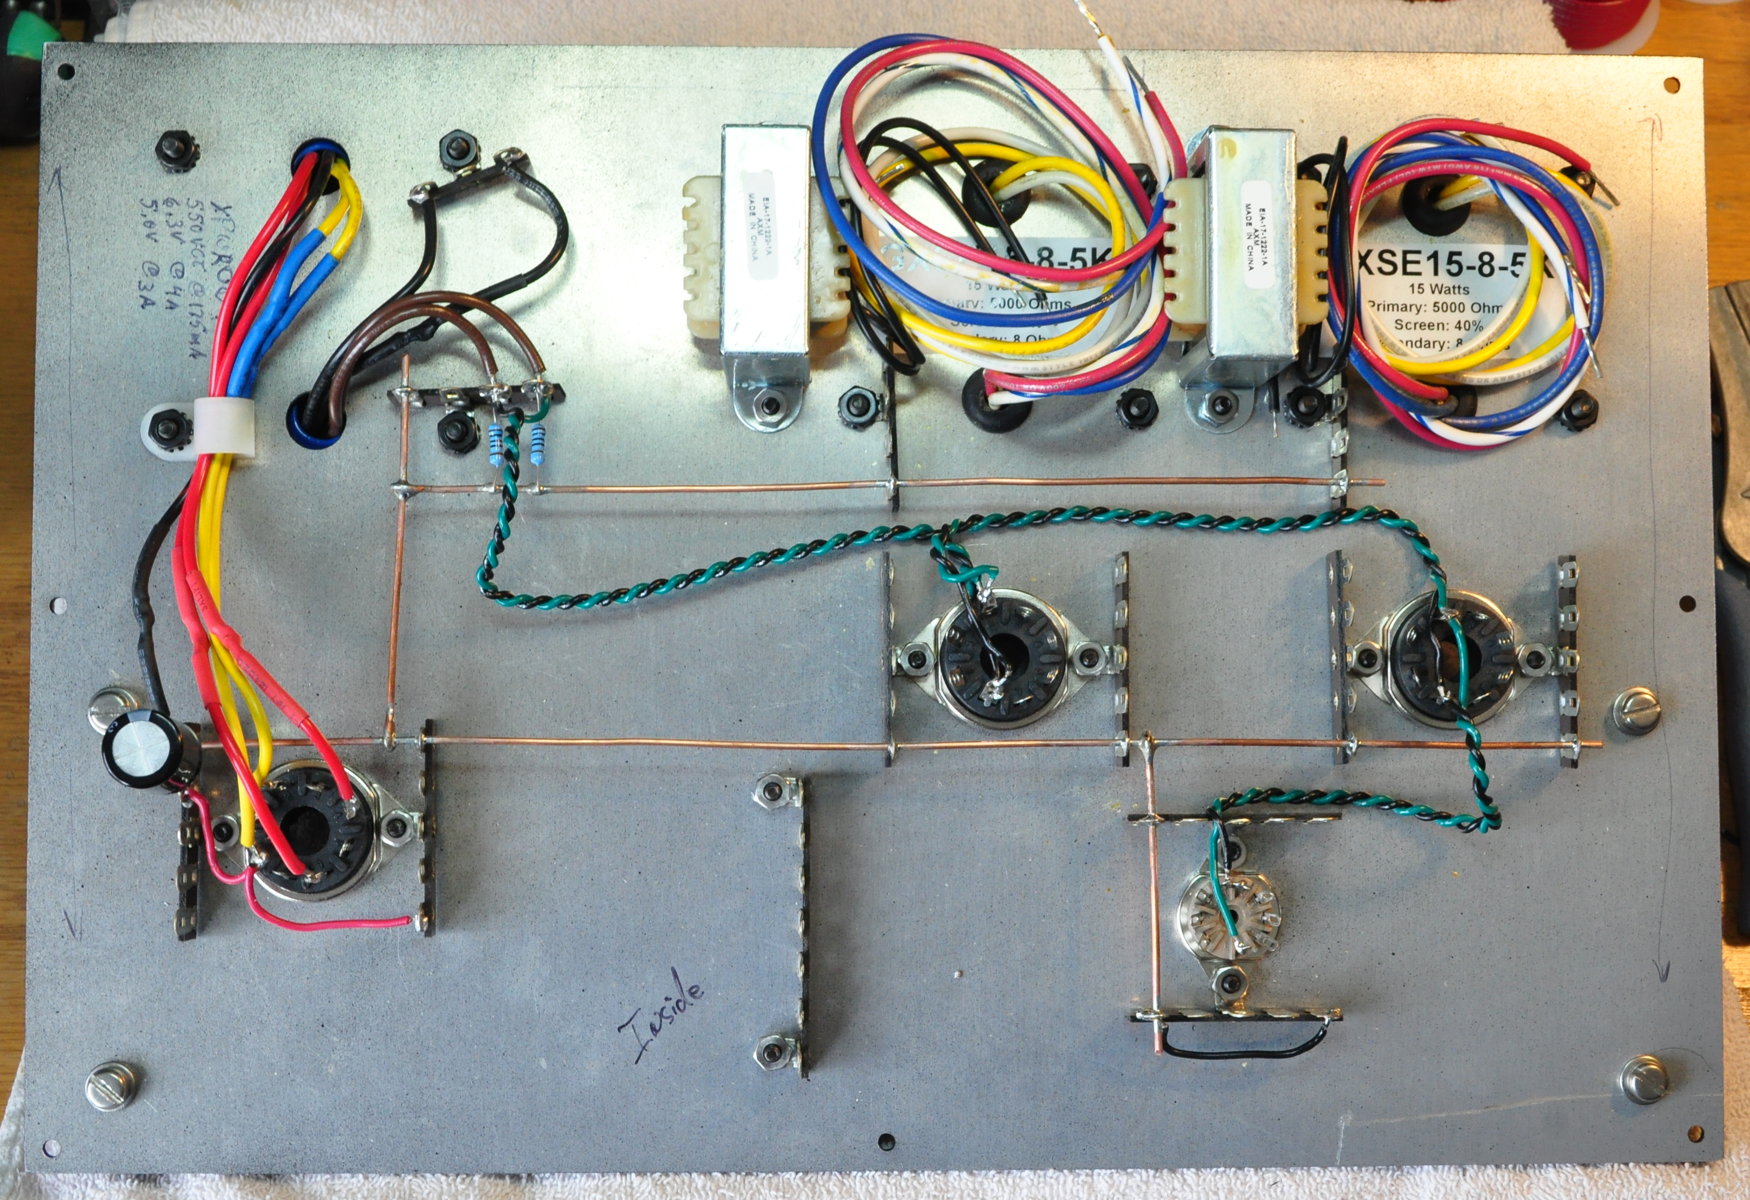
Those with sharp eyes will notice some blue shrink wrap tubing on the yellow rectifier filament leads. That’s because this power transformer actually came out of my prototyping station. Since I virtually always use my Heathkit IP-17 Power Supply now. The transformer in the prototyping station was sitting unused. Not anymore.
By the way, did you know that Heathkit has emerged form bankruptcy and is once again selling project kits? Read all about it here: Heathkit
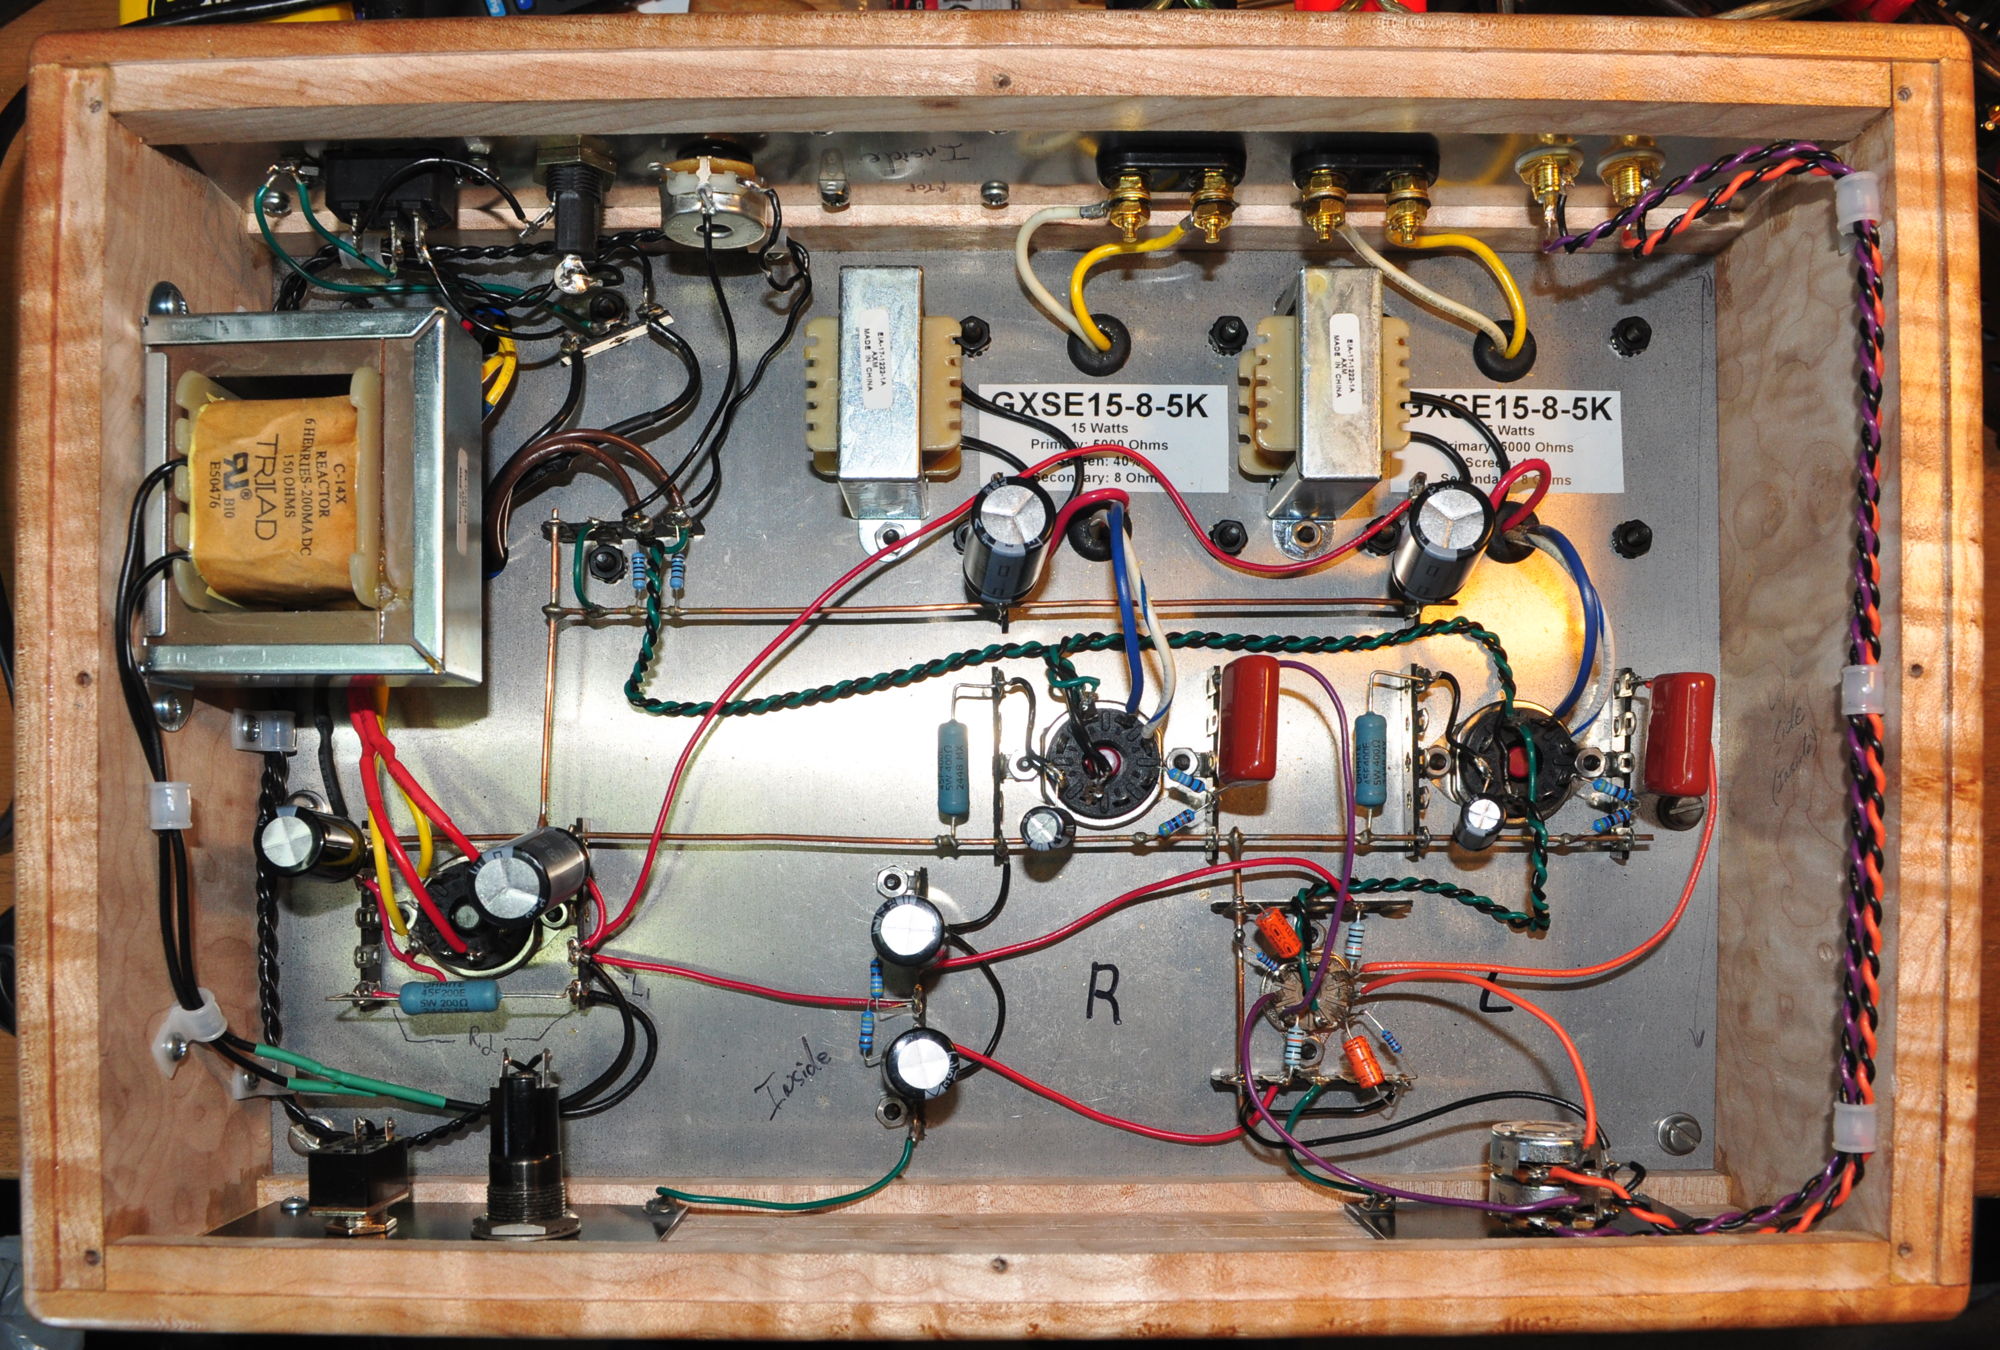
And here is that same top plate with all the wiring complete and ready for installation into the chassis.
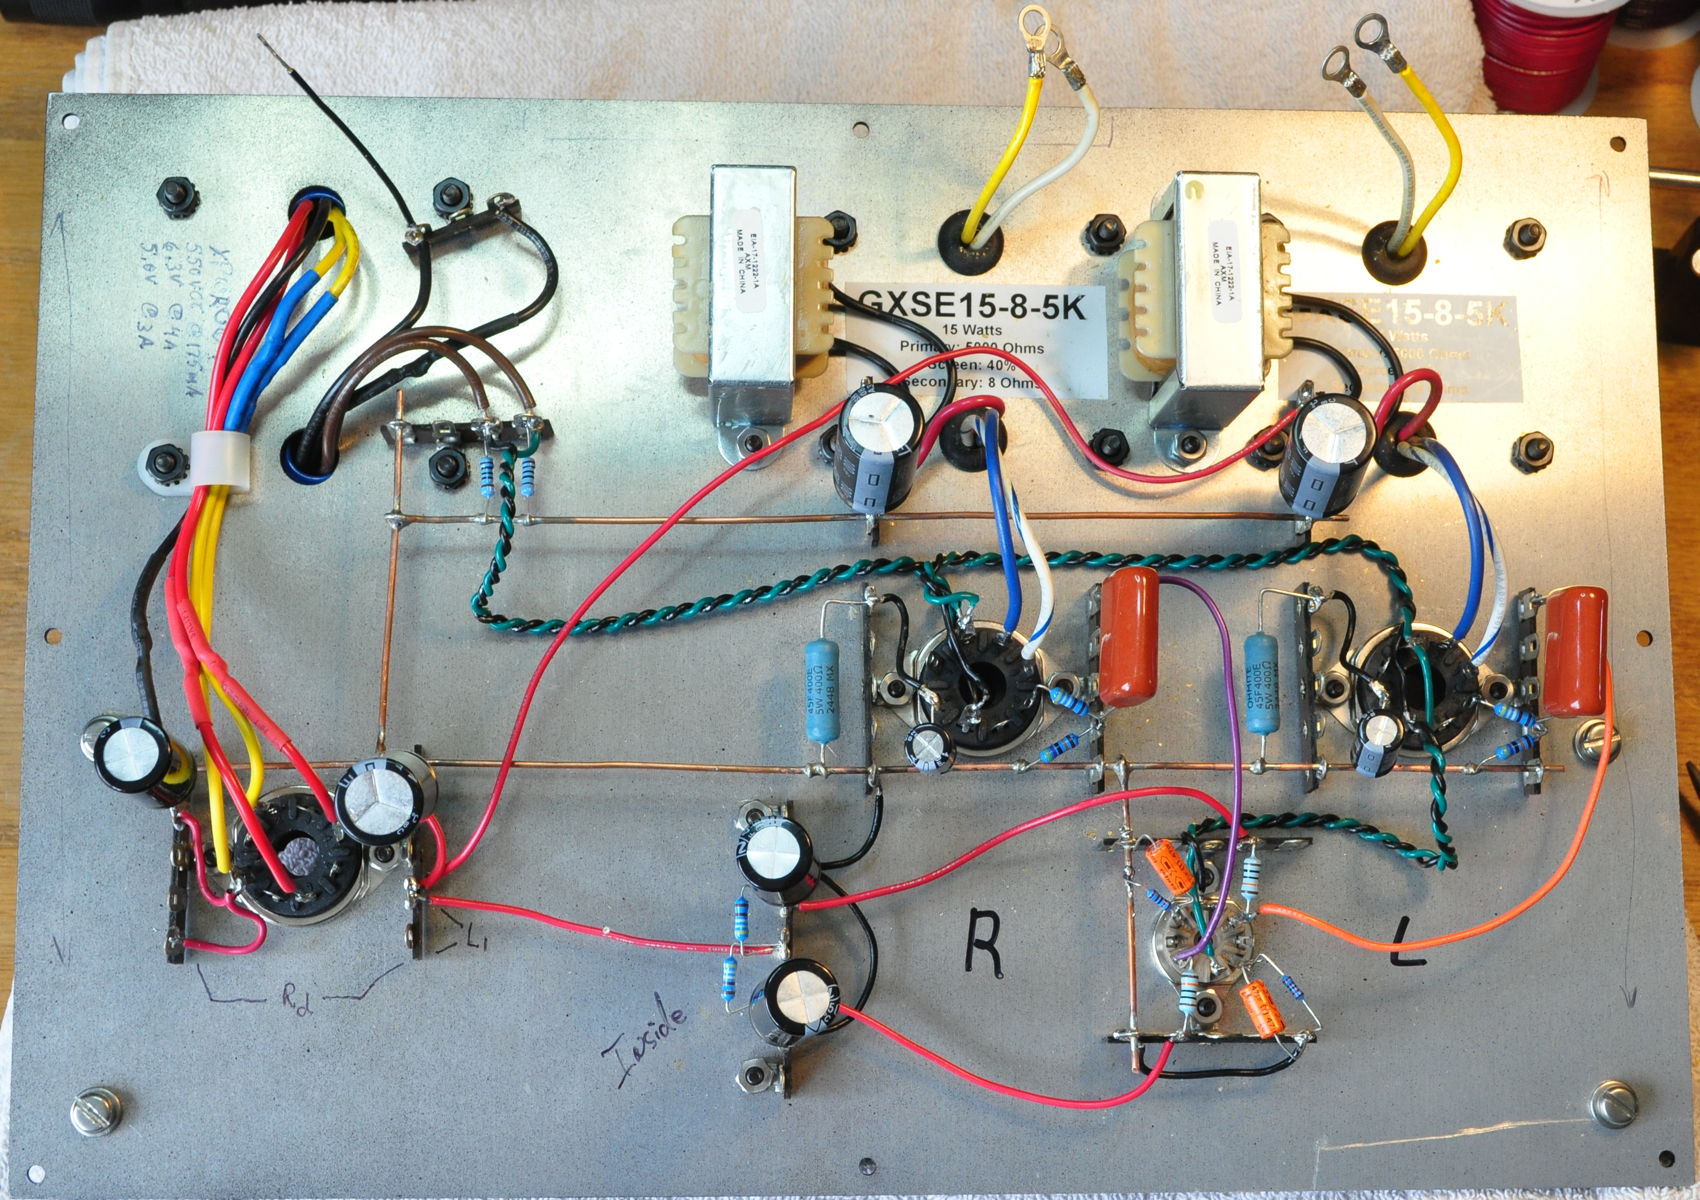
I’m very happy with how this turned out. The additional width allowed the internal layout to spread out a little bit. This helps with keeping the amplifier dead quiet and hum free.
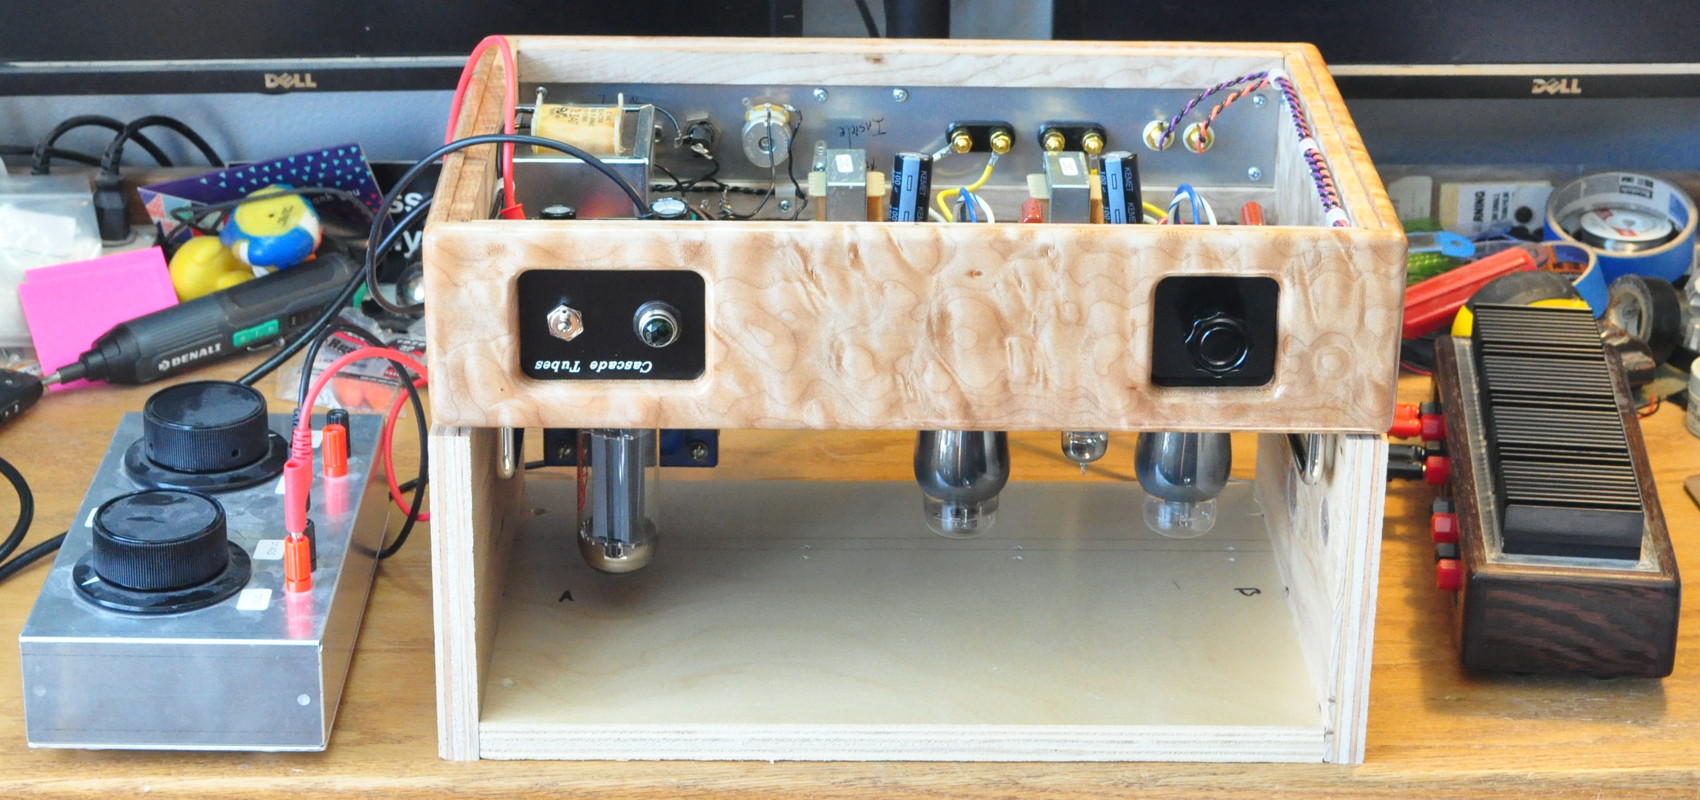
With the top plate complete I turned my attention to some initial wiring in the chassis itself. I like to do this wiring without either the top or bottom plates installed for much better access. It also allows me to focus on careful routing of signal lines and mains power distribution within the chassis itself. Here is the internal chassis wiring prior to mounting the populated top plate.
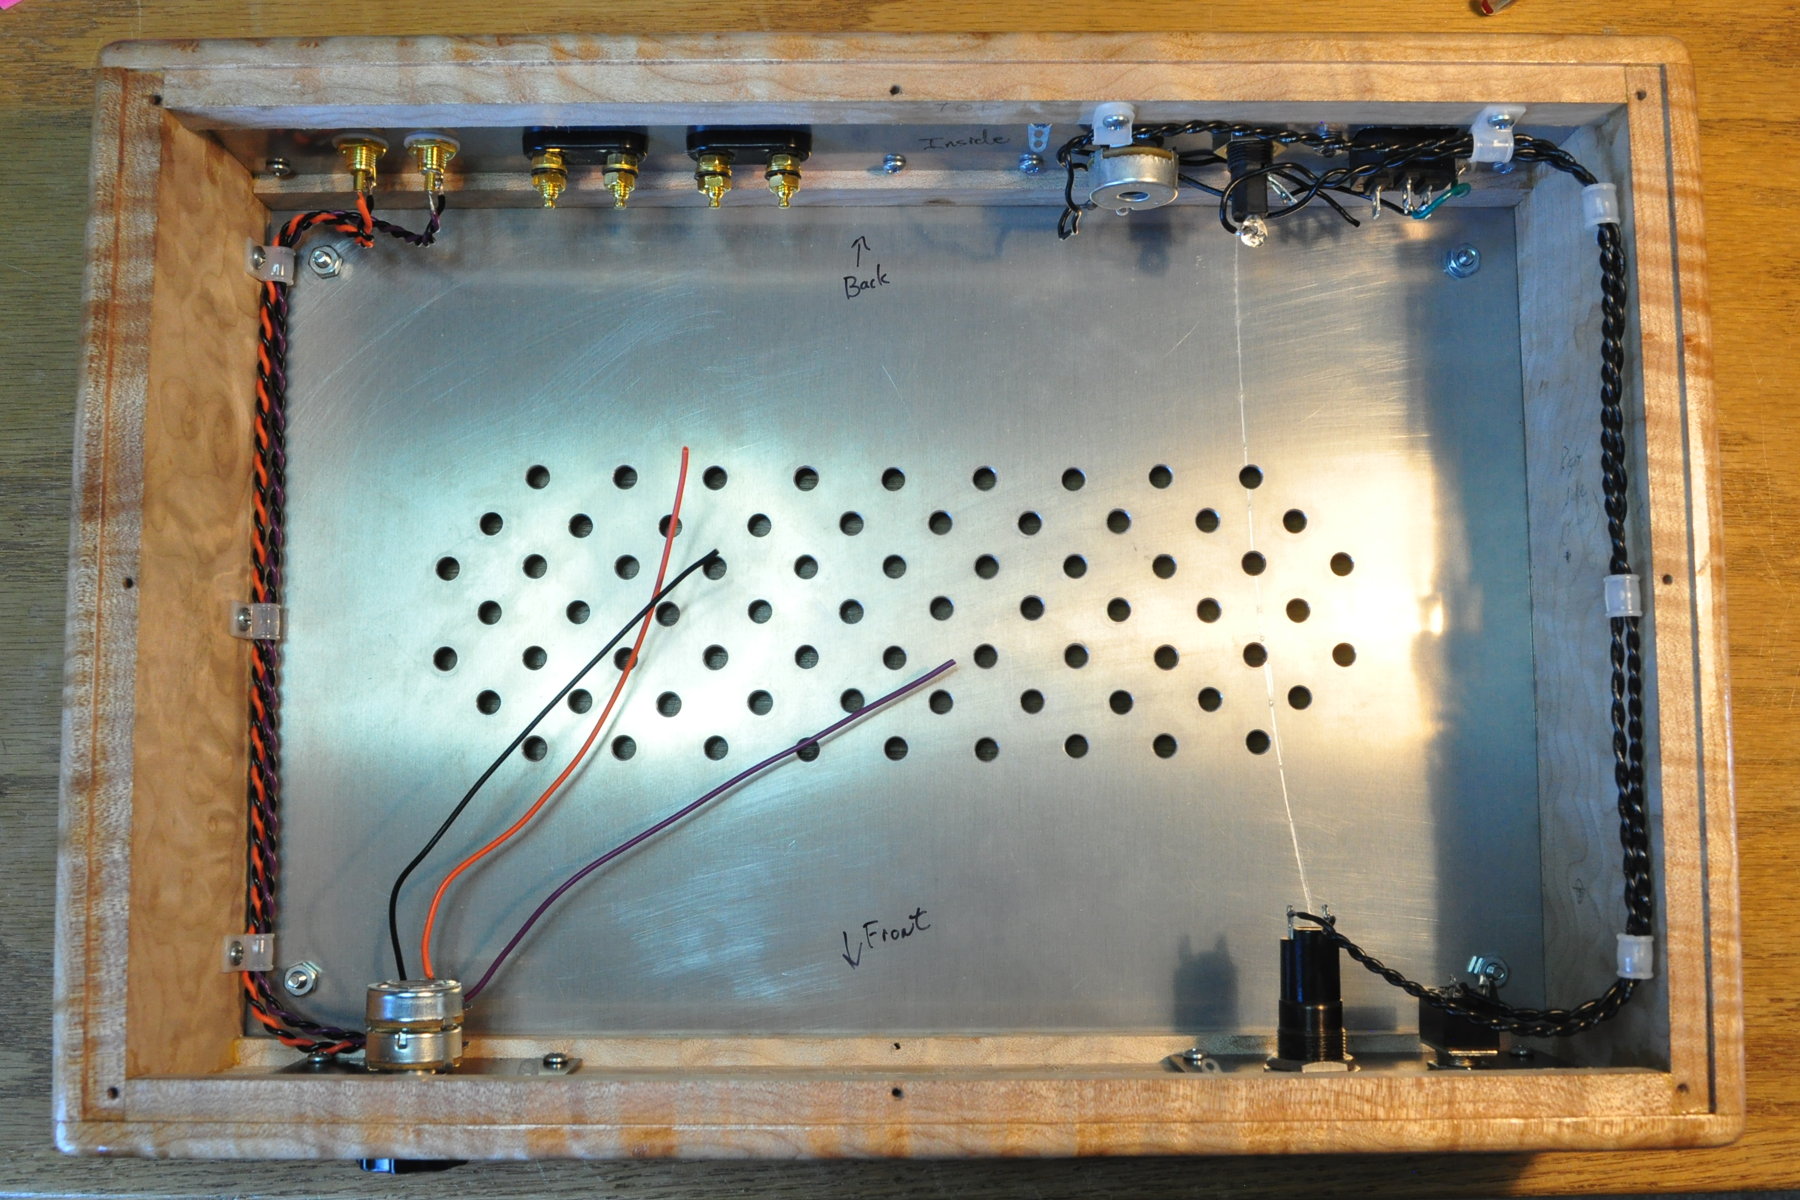
In this picture the twisted pair signal inputs and the mains and power indicator wiring are clearly visible. I find that keeping these runs on opposite sides of the chassis and tightly controlled helps keep the amp quiet and keeps wiring problems to a minimum. Note that the signal runs are kept against the bottom of the chassis to help isolate them from components mounted to the top plate.
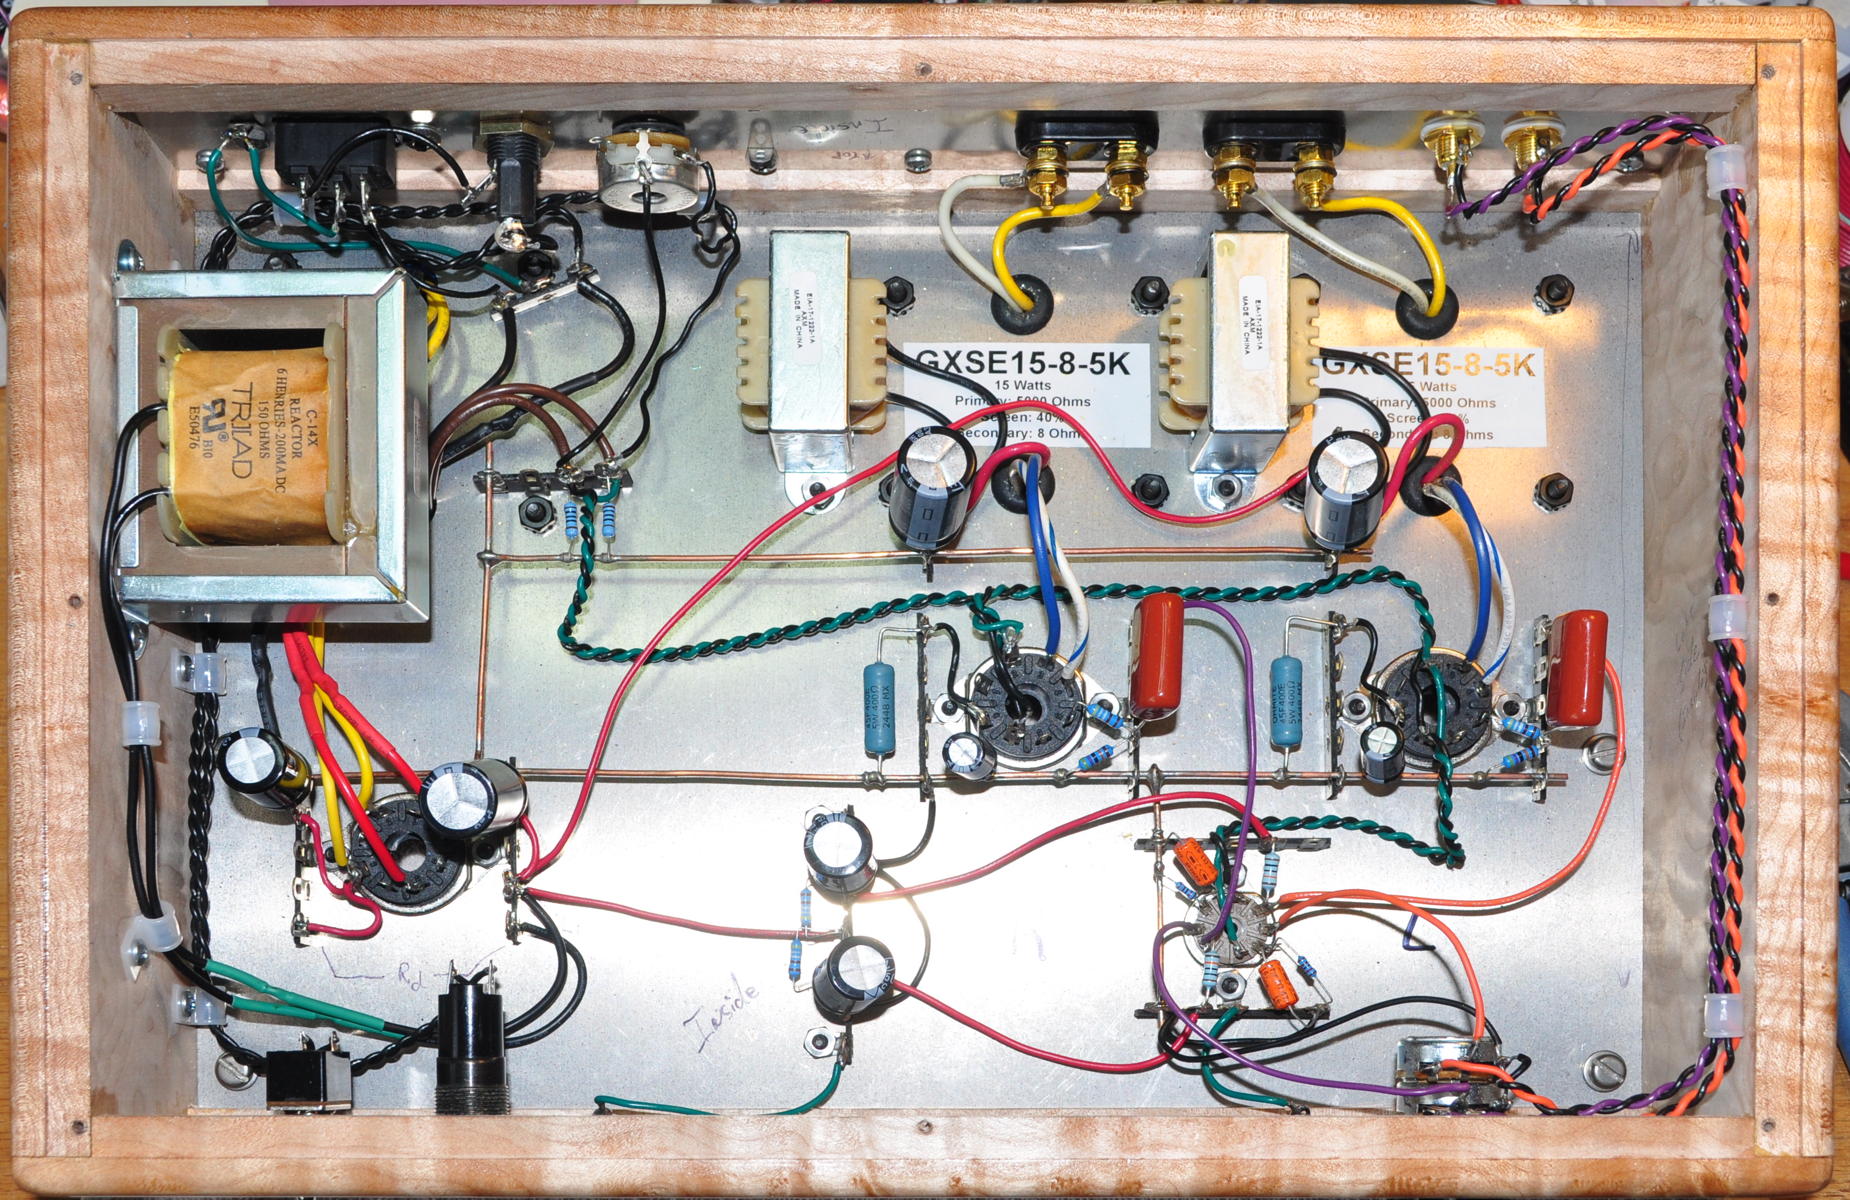
Following mounting the top plate and connecting up a few wires, the amplifier was largely complete. Here is the final internal assembly except for the dropping resistor.
One other thing I did with this amplifier was I decided that I would not paint either the bottom or the rear panel. Instead on these pieces I applied a simple brushed finish. Not only does this save labor, but it provides a nice finish for those parts of the amp which are normally hidden from view. Here is how the finished amp looks from the back showing off the brushed finish back plate.
Testing
Initial testing was just to settle on a B+ dropping resistor. I fired up the amp in a test cradle with a heavy rheostat connected to the dropping resistor connection within the chassis.
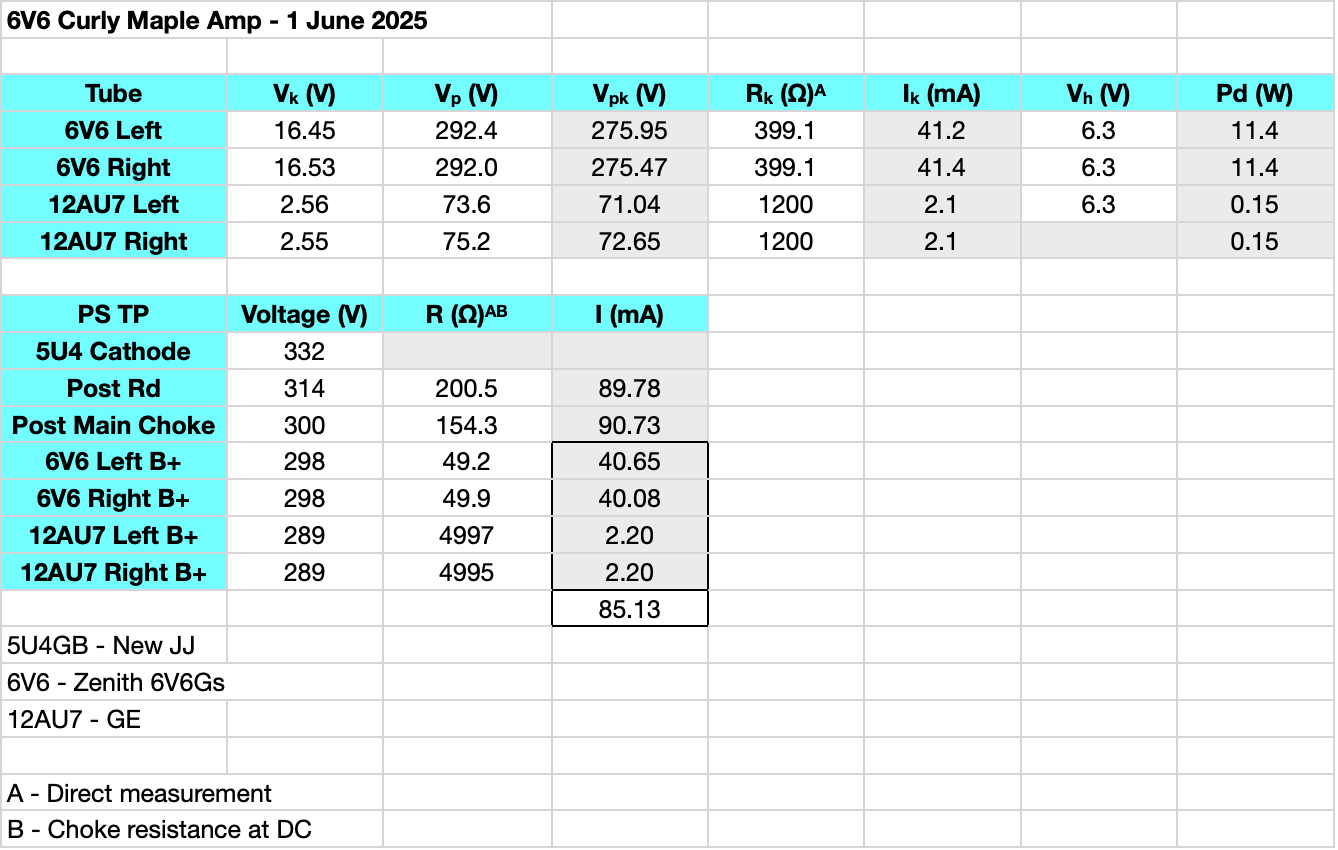
The target B+ for the power stages was 300vdc. Selecting a 200Ω resistor resulted in power stage B+ voltages of 298V for both channels. Here are the final voltages using the Zenith old stock 6V6G tubes with the dropping resistor installed.
Here is a picture of the final wiring complete with the dropping resistor.
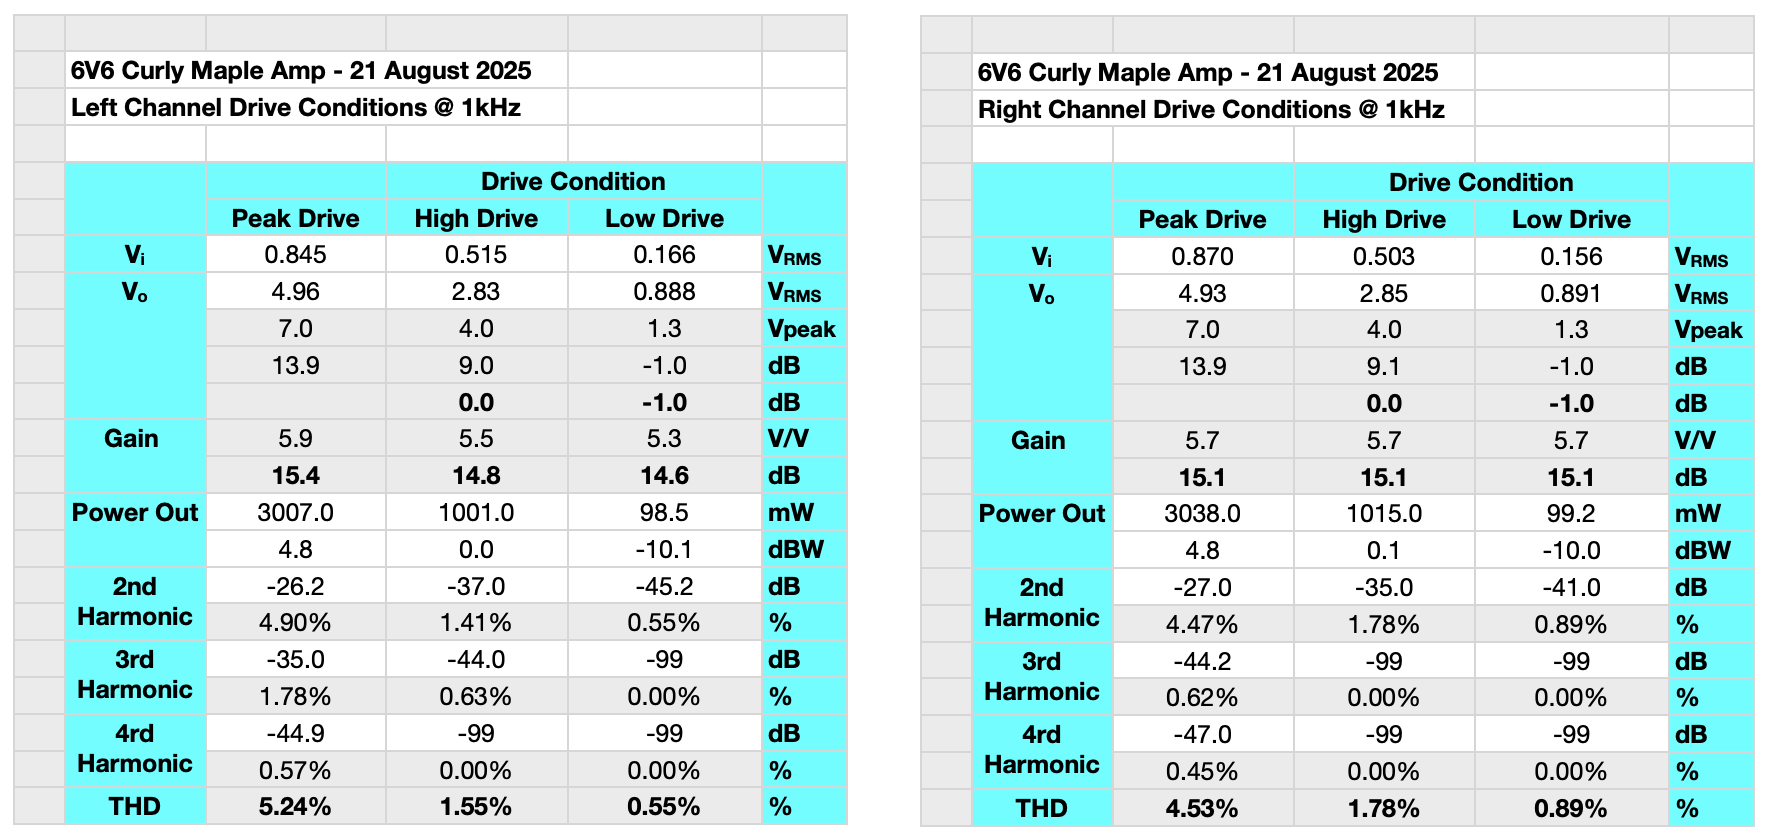
With everything complete the amp produces about 3W per channel peak, Here are the initial power and distortion numbers for both channels.
Before taking detailed numbers I decided to take the amp for a test ride. Here it is on my work desk producing it’s first music. The amp sounds really good.
A Slight Detour
This is where the development of this amplifier takes a detour. Some people pointed out to me that the power tubes I was using were at least 70 years old. So I decided to get a new pair of brand new TAD 6V6GT-STR “Red Base” Premium tubes and try them in the amp. This inserted a major delay in getting my write up complete. In addition, after testing and extended listening with the new tubes, I decided to go back to the old 6V6G tubes. At some point in the future I may publish a head to head comparison. However, obviously in the end I preferred the Zenith 6V6G power tubes over the brand new TAD 6V6 “Red Base” tubes. This is a story all unto itself.
Electrical Characterization
The amplifier exhibits a nice well behaved set of technical characteristics. Here are the plots of band pass and phase.
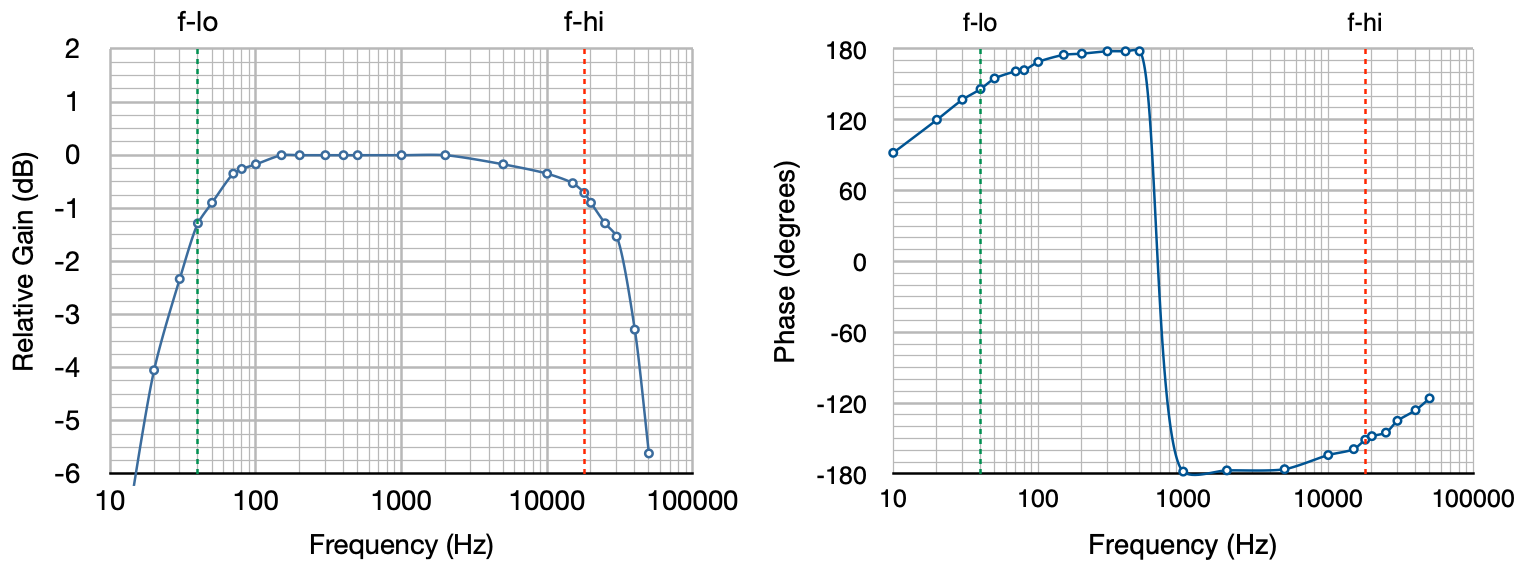
The -3dB band pass of the amplifier is about 25Hz to about 38kHz. The response is down just -4.0dB at 20Hz and just-0.9dB at 20kHz. This is an improvement of a little over 2dB at 20Hz with respect to the original Marblewood amplifier. The low frequency distortion is also better controlled with the larger 15W Edcor GXSE15-5kΩ output transformers.
Impressions
First off, the amp is dead silent. With no input there is nothing to be heard even with my ear directly up against the speakers. I’m very pleased with how this build came out. Second, this amplifier has probably the best imaging of any amplifier I have ever built. It is even better than the 6L6 Spalted Alder amplifier. Recall that I said of the 6L6 Spalted Alder:
When listening to good classical scores I could easily pick out individual instruments and their details.
That amplifier has very good imaging. This amplifier is even better! Picking out instrument and vocal positions was effortless. This applies to everything from small group jazz to big classical scores. The imaging is just that good!
I also investigated that improved bottom end I was going for in this design. It didn’t disappoint. My typical bass test tracks, Not Fragile (quad mix) off the Bachman-Turner Overdrive “The Anthology” album and Cold Cold Heart off the Norah Jones “Come Away with Me” album, both came through both clean and very powerful. I also added 99 Pounds from Humble Pie’s “The Definitive Collection” album and a couple of Avi Kaplan songs, Change on the Rise and First Place I Go. These also came through with powerful and well controlled bass lines. I was also able to pick out fine details that aren’t always obvious. On this amp the detail is incredible.
I even tried out some Gregorian Chant recorded in a cathedral. These tracks are usually notoriously hard for detailing because of the natural reverberation of the recording environment. I could easily find the positions of soloists within the choir while listening to these tracks on the new amplifier.
The amplifier provided this excellent bass and imaging without sacrificing any speed or detail. My usual detail test track, Frederick The Great : Sonata in B-Flat – Allegro for recorder played by Michala Petri, preserved all of its speed, lightness, and detail. I tried some other fast tracks on the fly as well and all of them performed flawlessly. The larger inductance of the output transformers did not adversely affect the speed or clarity of this amplifier.
Versatility Preserved
Due to its electrical design this amplifier preserves all the tube rolling versatility of the Marblewood. In this amplifier the acceptable driver tubes are the 12AU7, 12BH7, 12AV7, 12AY7, 12AT7, 12AZ7, and 12AX7. It should be noted that these tubes can produce wildly different gain values which will significantly change the sensitivity of the amplifier. The acceptable power tubes are the 6V6, 7408, 6L6, 5881, 6F6, and 6W6.
My experience with the Marblewood leads me to recommend the 12AU7 in the driver tube position and either the 6V6 or 6L6 in the power tube slots. But feel free to try out any combinations you prefer.
Conclusions
This amplifier definitely achieved the goals I had in mind. The low frequency response measurably improved and in listening the bass feels a little more powerful than the Marblewood. The imaging of this amplifier is incredible. Closing my eyes it was easy to pick out individual instruments on the sound stage. This amplifier has the absolute best imaging detail of any amplifier I have ever built.
This amplifier is also has a very nice voice. By this I mean that it sounds very true to the source material. It preserves range and detail letting the listener experience the totality of the music. The more I listen to this amplifier, the more I enjoy it.
So let me know what you think of the 6V6 “Curly Maple” amplifier.
Hi Matt
A beautiful amplifier, and a very educational post. Thanks for sharing this project. Where do you connect your ground bus to the chassis? Thank you.
The ground tie between signal ground and chassis (i.e. safety) ground is only at one point. In this amplifier it’s at the power supply directly adjacent to the virtual ground for the heater circuit. Here’s a picture.
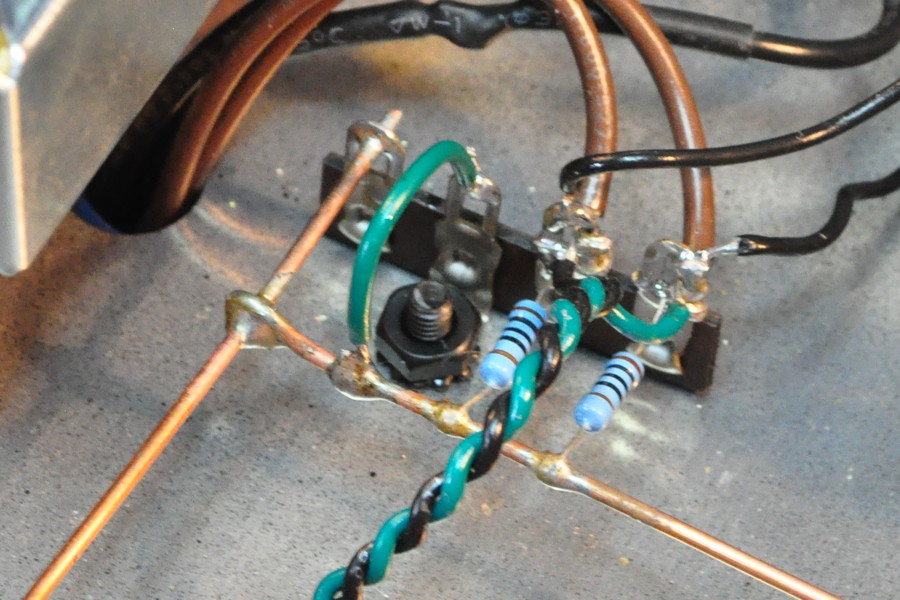
The green wire is the ground tie. I hope this makes it clear.
It does. Thank you for the reply and additional picture.
Ciao Matt.
Ho notato che per i segnali di BF non usi cavetti schermati ma del filo normale.
Angelo
> Hi Matt.
> I noticed that for the audio signals,
> you don’t use shielded cables,
> but rather ordinary wire.
> Angelo
Not quite ordinary. Those are twisted pairs. By twisting the signal and return wires, the pair have a very high immunity to varying magnetic fields. Since the highest interfering fields in the chassis are magnetic fields at the mains oscillation frequency, this makes for a very quiet run without have to deal with the added complication of shields.
The only time that shields are really required in an amplifier of this type is when the signals are 20dB to 30dB or more below normal line level signals. Two good examples are the input to a guitar amplifier or the input from a MM or MC phono cartridge going into a RIAA phono preamp.
The rule to keep in mind is that shields only give immunity from electric fields and twisted pairs only provide immunity from magnetic fields. If your worried about hum use twisted pairs, if your worried about induced (i.e. field coupled) noise, use shields.
Ciao Matt.
Ma l’uso dei doppini o dei cavetti schermati influiscono sul segnale?
Angelo
> Hi Matt
> But does the use of twisted pairs or shielded cables affect the signal?
> Angelo
No. Not at audio frequencies. Both may add a few pf of additional capacitance but this will have no noticeable effect at audio frequencies.
Wow what a great write up. A pleasure to read.
Your attention to detail has really paid off in this project.
A beautiful looking amp and by your account the sound matches the beauty of the build.
Good for you.
Your work is an inspiration for others.
Thanks
Ciao Matt
Da Palermo Sicilia.
Per la tua bellissima idea di regalare l’amplificatore Curly Maple quale richiesta migliore di donarlo alla Sicilia,particolare Palermo.
Angelo
>Hi Matt,
>From Palermo, Sicily.
>Regarding your wonderful idea to give away the Curly Maple
>amplifier—what better request could there be than to donate
>it to Sicily, and specifically to Palermo?
>Angelo
Unfortunately, the recipient for this particular amplifier was chosen before the build even started. And while I would love the opportunity to deliver it to Palermo personally, the amplifier will be staying a little closer to home with a family member.